Build and release an Android app
How to prepare for and release an Android app to the Play store.
To test an app, you can use flutter run at the command line,
or the Run and Debug options in your IDE.
When you're ready to prepare a release version of your app, for example to publish to the Google Play Store, this page can help. Before publishing, you might want to put some finishing touches on your app. This guide explains how to perform the following tasks:
- Add a launcher icon
- Enable Material Components
- Sign the app
- Shrink your code with R8
- Enable multidex support
- Review the app manifest
- Review the build configuration
- Build the app for release
- Publish to the Google Play Store
- Update the app's version number
- Android release FAQ
Add a launcher icon
#When a new Flutter app is created, it has a default launcher icon. To customize this icon, you might want to check out the flutter_launcher_icons package.
Alternatively, you can do it manually using the following steps:
-
Review the Material Design product icons guidelines for icon design.
-
In the
[project]/android/app/src/main/res/directory, place your icon files in folders named using configuration qualifiers. The defaultmipmap-folders demonstrate the correct naming convention. -
In
AndroidManifest.xml, update theapplicationtag'sandroid:iconattribute to reference icons from the previous step (for example,<application android:icon="@mipmap/ic_launcher" ...). -
To verify that the icon has been replaced, run your app and inspect the app icon in the Launcher.
Enable Material Components
#If your app uses platform views, you might want to enable Material Components by following the steps described in the Getting Started guide for Android.
For example:
-
Add the dependency on Android's Material in
<my-app>/android/app/build.gradle.kts:
dependencies {
    // ...
    implementation("com.google.android.material:material:<version>")
    // ...
}
dependencies {
    // ...
    implementation 'com.google.android.material:material:<version>'
    // ...
}
To find out the latest version, visit Google Maven.
-
Set the light theme in
<my-app>/android/app/src/main/res/values/styles.xml:xml<style name="NormalTheme" parent="@android:style/Theme.Light.NoTitleBar"> <style name="NormalTheme" parent="Theme.MaterialComponents.Light.NoActionBar"> -
Set the dark theme in
<my-app>/android/app/src/main/res/values-night/styles.xml:xml<style name="NormalTheme" parent="@android:style/Theme.Black.NoTitleBar"> <style name="NormalTheme" parent="Theme.MaterialComponents.DayNight.NoActionBar">
Sign the app
#To publish on the Play Store, you must sign your app with a digital certificate.
Android uses two signing keys: upload and app signing.
-
Developers upload an
.aabor.apkfile signed with an upload key to the Play Store. - The end-users download the
.apkfile signed with an app signing key.
To create your app signing key, use Play App Signing as described in the official Play Store documentation.
To sign your app, use the following instructions.
Create an upload keystore
#If you have an existing keystore, skip to the next step. If not, create one using one of the following methods:
-
Follow the Android Studio key generation steps.
-
Run the following command at the command line:
On macOS or Linux, use the following command:
keytool -genkey -v -keystore ~/upload-keystore.jks -keyalg RSA \ -storetype JKS -keysize 2048 -validity 10000 -alias uploadOn Windows, use the following command in PowerShell:
keytool -genkey -v -keystore $env:USERPROFILE\upload-keystore.jks ` -storetype JKS -keyalg RSA -keysize 2048 -validity 10000 ` -alias uploadThis command stores the
upload-keystore.jksfile in your home directory. If you want to store it elsewhere, change the argument you pass to the-keystoreparameter. However, keep thekeystorefile private; don't check it into public source control!
Reference the keystore from the app
#
Create a file named [project]/android/key.properties
that contains a reference to your keystore.
Don't include the angle brackets (< >).
They indicate that the text serves as a placeholder for your values.
storePassword=<password-from-previous-step>
keyPassword=<password-from-previous-step>
keyAlias=upload
storeFile=<keystore-file-location>
The storeFile might be located at
/Users/<user name>/upload-keystore.jks on macOS
or C:\\Users\\<user name>\\upload-keystore.jks on Windows.
Configure signing in Gradle
#
When building your app in release mode, configure Gradle to use your upload key.
To configure Gradle, edit the <project>/android/app/build.gradle.kts
file.
-
Define and load the keystore properties file before the
androidproperty block. Set the
keystorePropertiesobject to load thekey.propertiesfile.
import java.util.Properties
import java.io.FileInputStream
plugins {
...
}
val keystoreProperties = Properties()
val keystorePropertiesFile = rootProject.file("key.properties")
if (keystorePropertiesFile.exists()) {
keystoreProperties.load(FileInputStream(keystorePropertiesFile))
}
android {
...
}
import java.util.Properties
import java.io.FileInputStream
plugins {
...
}
def keystoreProperties = new Properties()
def keystorePropertiesFile = rootProject.file('key.properties')
if (keystorePropertiesFile.exists()) {
keystoreProperties.load(new FileInputStream(keystorePropertiesFile))
}
android {
...
}
-
Add the signing configuration before the
buildTypesproperty block inside theandroidproperty block.
android {
// ...
signingConfigs {
create("release") {
keyAlias = keystoreProperties["keyAlias"] as String
keyPassword = keystoreProperties["keyPassword"] as String
storeFile = keystoreProperties["storeFile"]?.let { file(it) }
storePassword = keystoreProperties["storePassword"] as String
}
}
buildTypes {
release {
// TODO: Add your own signing config for the release build.
// Signing with the debug keys for now,
// so `flutter run --release` works.
signingConfig = signingConfigs.getByName("debug")
signingConfig = signingConfigs.getByName("release")
}
}
...
}
android {
// ...
signingConfigs {
release {
keyAlias = keystoreProperties['keyAlias']
keyPassword = keystoreProperties['keyPassword']
storeFile = keystoreProperties['storeFile'] ? file(keystoreProperties['storeFile']) : null
storePassword = keystoreProperties['storePassword']
}
}
buildTypes {
release {
// TODO: Add your own signing config for the release build.
// Signing with the debug keys for now,
// so `flutter run --release` works.
signingConfig = signingConfigs.debug
signingConfig = signingConfigs.release
}
}
...
}
Flutter now signs all release builds.
To learn more about signing your app, check out Sign your app on the Android developer docs.
Post-quantum cryptography (PQC) hybrid signing (Android 17+)
#Android 17 introduces the v3.2 APK Signature Scheme. This scheme combines classical signatures (such as RSA or EC) with ML-DSA signatures to enable post-quantum cryptography (PQC) hybrid signing. This future-proofs your app's signing identity against the potential threat of attacks that make use of quantum computing.
- Apps using Play App Signing: If you use Play App Signing, you can wait for Google Play to give you the option to upgrade to a hybrid signature using a PQC key generated by Google Play.
-
Apps using self-managed keys:
If you manage your own signing keys,
you can use updated Android build tools (such as
apksigner) to rotate to a hybrid identity, combining a PQC key with a new classical key. Note that you must create a new classical key; you cannot reuse the older one.
For more information, check out the Android documentation on PQC APK signing
Shrink your code with R8
#
R8 is the new code shrinker from Google.
It's enabled by default when you build a release APK or AAB.
To disable R8, pass the --no-shrink flag to
flutter build apk or flutter build appbundle.
Enable multidex support
#
When writing large apps or making use of large plugins,
you might encounter Android's dex limit of 64k methods
when targeting a minimum API of 20 or below.
This might also be encountered when running debug versions of your app
using flutter run that doesn't have shrinking enabled.
Flutter tool supports easily enabling multidex.
The simplest way is to opt into multidex support when prompted.
The tool detects multidex build errors and
asks before making changes to your Android project.
Opting in allows Flutter to automatically depend on
androidx.multidex:multidex and use a generated
FlutterMultiDexApplication as the project's application.
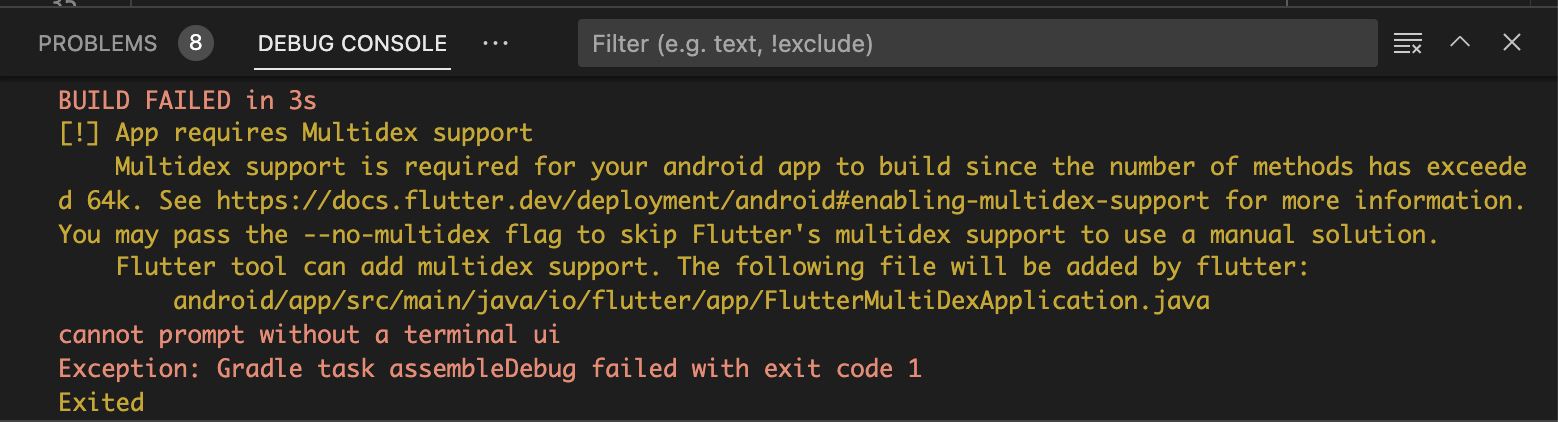
When you try to build and run your app with the Run and Debug options in your IDE, your build might fail with the following message:
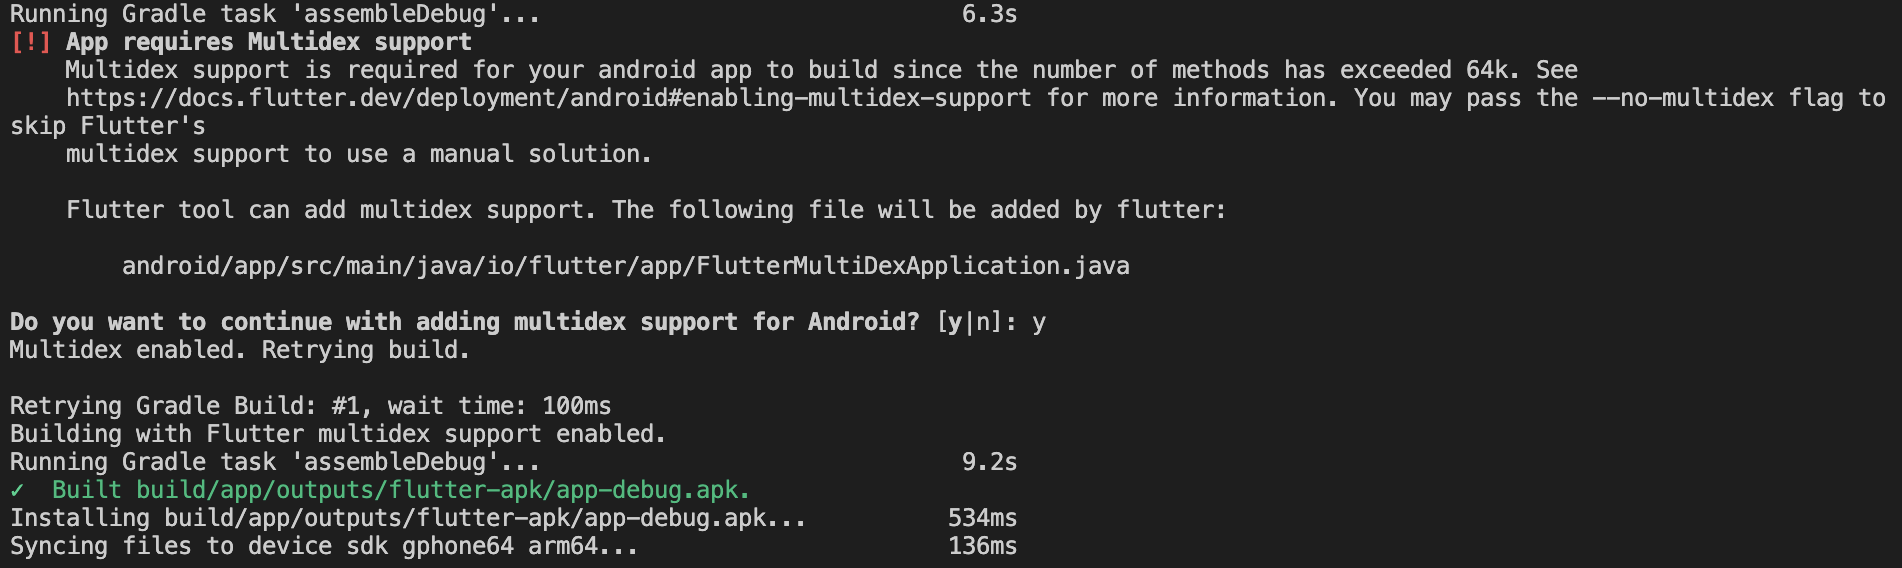
To enable multidex from the command line,
run flutter run --debug and select an Android-powered device:

When prompted, enter y.
The Flutter tool enables multidex support and retries the build:
You might also choose to manually support multidex by following Android's guides and modifying your project's Android directory configuration. A multidex keep file must be specified to include:
io/flutter/embedding/engine/loader/FlutterLoader.class
io/flutter/util/PathUtils.class
Also, include any other classes used in app startup. For more detailed guidance on adding multidex support manually, check out the official Android documentation.
Review the app manifest
#Review the default App Manifest file.
<manifest xmlns:android="http://schemas.android.com/apk/res/android">
    <application
        android:label="[project]"
        ...
    </application>
    ...
    <uses-permission android:name="android.permission.INTERNET"/>
</manifest>
Verify the following values:
| Tag | Attribute | Value |
|---|---|---|
application
|
Edit the
android:label
in the
application
tag to reflect the final name of the app.
|
|
uses-permission
|
Add the
android.permission.INTERNET
permission
value to the
android:name
attribute if your app needs Internet access. The standard template doesn't include this tag but allows Internet access during development to enable communication between Flutter tools and a running app.
|
Review the Gradle build configuration
#
To verify the Android build configuration,
review the android block in the default
Gradle build script.
The default Gradle build script is found at [project]/android/app/build.gradle.kts.
android {
namespace = "com.example.[project]"
// Any value starting with "flutter." gets its value from
// the Flutter Gradle plugin.
// To change from these defaults, make your changes in this file.
compileSdk = flutter.compileSdkVersion
ndkVersion = flutter.ndkVersion
...
defaultConfig {
// TODO: Specify your own unique Application ID (https://developer.android.com/studio/build/application-id.html).
applicationId = "com.example.[project]"
// You can update the following values to match your application needs.
// For more information, see: https://flutter.dev/to/review-gradle-config.
minSdk = flutter.minSdkVersion
targetSdk = flutter.targetSdkVersion
versionCode = flutter.versionCode
versionName = flutter.versionName
}
buildTypes {
...
}
}
Application ID
#
The applicationId is the unique identifier for your app on the Google Play Store
and on developers' devices.
If you update the applicationId and namespace properties,
you must also update the package statement in your MainActivity.kt
or MainActivity.java file and move the file
to the corresponding directory structure.
For example:
-
In Kotlin, if your new ID is
com.example.myapp, move yourMainActivityfile toandroid/app/src/main/kotlin/com/example/myapp/MainActivity.ktand ensure the first line ispackage com.example.myapp. -
In Java, move your
MainActivityfile toandroid/app/src/main/java/com/example/myapp/MainActivity.javaand ensure the first line ispackage com.example.myapp.
Android SDK versions
#The Flutter tooling sets default values for the Android SDK versions:
compileSdk: The version of the Android SDK used to compile the app.minSdk: The minimum Android version that the app supports.-
targetSdk: The Android version the app is designed and tested to run on.
These default values (flutter.compileSdkVersion, etc.) are managed by Flutter
to ensure compatibility with the framework and plugins.
You typically do not need to change these unless:
-
You need a newer API: If you are using a plugin or feature that requires a higher
minSdkthan Flutter's default, you can manually set it to a higher version number (for example,minSdk = 24). - You need to lock versions: If you want to prevent automatic updates to these versions when upgrading Flutter, you can replace the default variables with specific integer values.
Version code and name
#
The versionCode and versionName are automatically set from your pubspec.yaml
file
(using the version: 1.0.0+1 field). You generally don't need to modify these in the Gradle file.
Build the app for release
#You have two possible release formats when publishing to the Play Store.
- App bundle (preferred)
- APK
Build an app bundle
#This section describes how to build a release app bundle. If you completed the signing steps, the app bundle will be signed. At this point, you might consider obfuscating your Dart code to make it more difficult to reverse engineer. Obfuscating your code involves adding flags to your build command and maintaining additional files to de-obfuscate stack traces.
From the command line:
- Enter
cd [project] -
Run
flutter build appbundle
(Runningflutter builddefaults to a release build.)
The release bundle for your app is created at
[project]/build/app/outputs/bundle/release/app.aab.
By default, the app bundle contains your Dart code and the Flutter runtime compiled for armeabi-v7a (ARM 32-bit), arm64-v8a (ARM 64-bit), and x86-64 (x86 64-bit).
Test the app bundle
#An app bundle can be tested in multiple ways. This section describes two.
Offline using the bundle tool
#-
If you haven't done so already, download
bundletoolfrom its GitHub repository. - Generate a set of APKs from your app bundle.
- Deploy the APKs to connected devices.
Online using Google Play
#- Upload your bundle to Google Play to test it. You can use the internal test track, or the alpha or beta channels to test the bundle before releasing it in production.
- Follow the steps to upload your bundle to the Play Store.
Build an APK
#Although app bundles are preferred over APKs, there are stores that don't yet support app bundles. In this case, build a release APK for each target ABI (Application Binary Interface).
If you completed the signing steps, the APK will be signed. At this point, you might consider obfuscating your Dart code to make it more difficult to reverse engineer. Obfuscating your code involves adding flags to your build command.
From the command line:
Enter
cd [project].-
Run
flutter build apk --split-per-abi. (Theflutter buildcommand defaults to--release.)
This command results in three APK files:
[project]/build/app/outputs/flutter-apk/app-armeabi-v7a-release.apk[project]/build/app/outputs/flutter-apk/app-arm64-v8a-release.apk[project]/build/app/outputs/flutter-apk/app-x86_64-release.apk
Removing the --split-per-abi flag results in a fat APK that contains
your code compiled for all the target ABIs.
Such APKs are larger in size than their split counterparts,
causing the user to download native binaries that
aren't applicable to their device's architecture.
When using split APKs, the framework adds ABI_VERSION * 1000
to the version code. This is because the Google Play Store
doesn't allow
multiple APKs for the same app to have the same version code.
To force the default version code, specify the
-P force-version-code-ignoring-abi=true flag during the build.
Install an APK on a device
#Follow these steps to install the APK on a connected Android-powered device.
From the command line:
- Connect your Android-powered device to your computer with a USB cable.
- Enter
cd [project]. - Run
flutter install.
Publish to the Google Play Store
#For detailed instructions on publishing your app to the Google Play Store, check out the Google Play launch documentation.
Update the app's version number
#
The default version number of the app is 1.0.0.
To update it, navigate to the pubspec.yaml file
and update the following line:
version: 1.0.0+1
The version number is three numbers separated by dots,
such as 1.0.0 in the preceding example,
followed by an optional build number,
such as 1 in the preceding example, separated by a +.
Both the version and the build number can be overridden in
Flutter's build by specifying --build-name and --build-number, respectively.
In Android, build-name is used as versionName while
build-number used as versionCode. For more information,
check out Version your app
in the Android documentation.
When you rebuild the app for Android, any updates in
the version number from the pubspec file will
update the versionName and versionCodein the local.properties
file.
Android release FAQ
#Here are some commonly asked questions about deployment for Android apps.
When should I build app bundles versus APKs?
#The Google Play Store recommends that you deploy app bundles over APKs because they allow a more efficient delivery of the application to your users. However, if you're distributing your application by means other than the Play Store, an APK might be your only option.
What is a fat APK?
#
A fat APK is a single APK that contains binaries for multiple
ABIs embedded within it. This has the benefit that the single APK
runs on multiple architectures and thus has wider compatibility,
but it has the drawback that its file size is much larger,
causing users to download and store more bytes when installing
your application. When building APKs instead of app bundles,
it is strongly recommended to build split APKs,
as described in build an APK using the
--split-per-abi flag.
What are the supported target architectures?
#When building your application in release mode, Flutter apps can be compiled for armeabi-v7a (ARM 32-bit), arm64-v8a (ARM 64-bit), and x86-64 (x86 64-bit).
How do I sign the app bundle created by flutter build appbundle?
#
Check out Sign the app.
How do I build a release from within Android Studio?
#
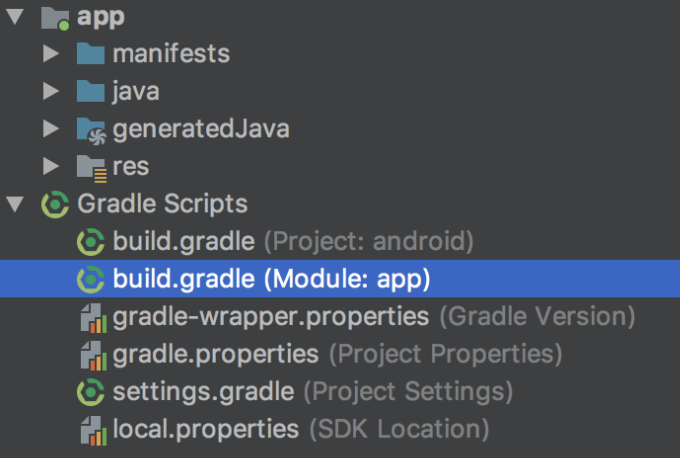
In Android Studio, open the existing android/
folder under your app's folder. Then,
select build.gradle (Module: app) in the project panel:
Next, select the build variant. Click Build > Select Build Variant in the main menu. Select any of the variants in the Build Variants panel (debug is the default):
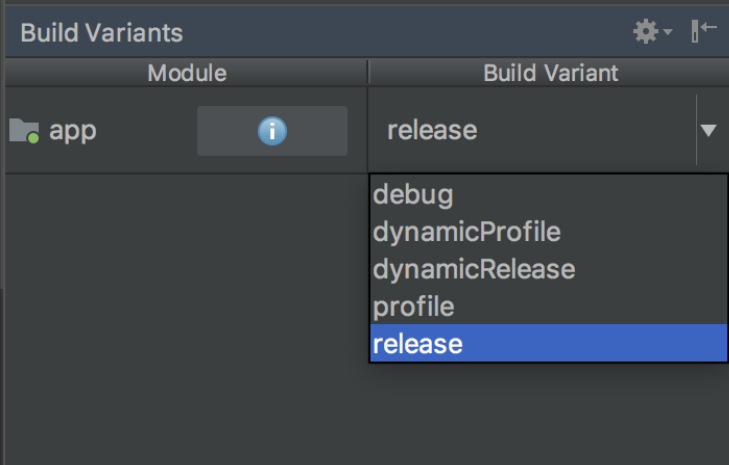
The resulting app bundle or APK files are located in
build/app/outputs within your app's folder.
How to tell if an apk uses Flutter?
#
You can use the apkanalyzer
tool and list the files:
apkanalyzer files list --files-only <SOME-APK> files list --files-only <SOME-APK>
Then look for a file in /lib/<ARCH>/libflutter.so.
For example, the following should return a number greater than 0:
apkanalyzer files list some-flutter-app.apk | grep flutter.so | wc -l
Why this works
Flutter depends on C++ code used by the Flutter engine. In Android,
this code is bundled with the Flutter framework and the developer's
Dart code as a native library called libflutter.so.
The Java/Android tooling renames the flutter library with the lib
prefix
and handles library location across architectures.
This is how some reverse engineer an APK to identify it as a Flutter app.
Secondary Evaluation:
#
Run apkanalyzer manifest print <SOME-APK> and look for a <meta-data>
tag with android:name="flutterEmbedding".
The value can be 1 or 2.
Example:
apkanalyzer manifest print some-flutter-app.apk | grep flutterEmbedding -C 2
returns the following style string.
<meta-data
   android:name="flutterEmbedding"
   android:value="2" />
Why this works
Flutter has had two different embedders,
and this flag was read to determine which embedder was used.
Flutter 3.22
removed the ability of v1 embedder apps to build.
This mechanism is not recommended because it's
unclear how long the flutterEmbedding value will
continue to be included in all Flutter apps.
Additionally, this won't work for all libraries written
in Flutter that are imported into Android apps as AAR dependencies.
Non-technical evaluation
#- Download Flutter Shark on a device and let it scan local apps.
- Visit the Flutter Hunt website.
Unless stated otherwise, the documentation on this site reflects Flutter 3.44.0. Page last updated on 2026-06-26. View source or report an issue.