Integrate a Flutter app into your iOS project
Learn how to integrate a Flutter app into your existing iOS project.
Flutter UI components can be incrementally added into your existing iOS application using Swift packages.
Prerequisites
#- Flutter 3.44 or later
- Xcode 15.0 or later
Migrate from legacy integration (if applicable)
#If you've already integrated Flutter into your iOS app using CocoaPods or embedded frameworks, you must first remove that integration before following the Swift Package Manager instructions below.
Expand to see instructions to migrate from CocoaPods integration
If your app was previously integrated using CocoaPods, you must first remove the Flutter installation code from your Podfile.
Remove Flutter installation code from your Podfile
MyApp/Podfilerubyflutter_application_path = '../my_flutter' load File.join(flutter_application_path, '.ios', 'Flutter', 'podhelper.rb') install_all_flutter_pods(flutter_application_path) flutter_post_install(installer) if defined?(flutter_post_install)Run
pod install.
Expand to see instructions to migrate from embedded frameworks integration
If your app was previously integrated using frameworks
generated by the flutter build ios-framework command,
you must first remove the frameworks from your Xcode project.
Navigate to your target's General tab and remove all Flutter-related frameworks and libraries under Frameworks, Libraries, and Embedded Content.
This includes the
App.xcframework,Flutter.xcframework,FlutterPluginRegistrant.xcframework, and any Flutter plugins'xcframeworkfiles.Remove the Flutter pod from your Podfile
MyApp/Podfilerubypod 'Flutter', :podspec => '/path/to/MyApp/Flutter/[build mode]/Flutter.podspec'Run
pod install.
The legacy integration guide is preserved for reference, but will not receive ongoing maintenance.
Organize your projects relative to each other
#This guide assumes that your existing iOS app and your Flutter app or module reside in sibling directories. If you have a different directory structure, you will need to adjust the example relative paths accordingly.
The example directory structure resembles the following:
-
my_flutter_app/
- ios/
lib/
- main.dart
-
MyNativeApp/
- MyNativeApp.xcodeproj/
-
my_flutter_app/
- .ios/
lib/
- main.dart
-
MyNativeApp/
- MyNativeApp.xcodeproj/
Integrate with Swift Package Manager
#-
Build the FlutterNativeIntegration Swift package
Within your Flutter application or module, run the following command:
flutter build swift-package --platform iosThis will generate the following directories:
my_flutter_app/build/ios/SwiftPackages/
- FlutterNativeIntegration/(A Swift package)
- Scripts/(Directory of scripts and other files needed)
You can optionally change the location of this output with the
--outputflag. -
Add FlutterNativeIntegration to your Xcode project
Open your existing iOS app in Xcode.
In the Project navigator, right click on your project and select Add Files to "MyNativeApp"...
Navigate to and select the generated
FlutterNativeIntegrationSwift package and click Add.Select Reference files in place and click Finish.
In the File inspector, verify the Location is Relative to Project. If it is not, you'll need to move the Flutter output directory to be a sibling directory of your native app.
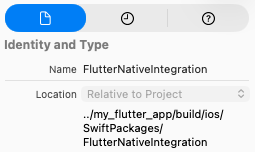
Relative location of FlutterNativeIntegration shown in Xcode's File inspector.
Navigate to your target's General tab and add
FlutterNativeIntegrationunder Frameworks, Libraries, and Embedded Content.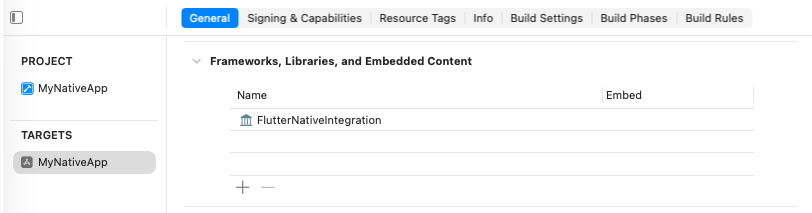
FlutterNativeIntegration under Frameworks, Libraries, and Embedded Content.
-
Add build settings
In the Build Settings tab, set the location of the Flutter app's Swift package output directory:
FLUTTER_SWIFT_PACKAGE_OUTPUT=$SRCROOT/../my_flutter_app/build/ios/SwiftPackagesFor custom configurations, set the Flutter build mode.
Flutter supports three build modes: Debug, Profile, and Release. The build mode is determined using the
CONFIGURATION. If your configuration does not match one of these, you can set theFLUTTER_BUILD_MODEbuild setting to one of these values.
Setting
FLUTTER_BUILD_MODEfor custom configurations under Build Settings.(Optional) Allow Xcode to re-build your Flutter app.
Add the below build settings to your target to allow Xcode to re-build your Flutter app as part of its build. This allows you to make changes to your Flutter application without needing to re-run
flutter build swift-package. This requires Flutter to be installed on the machine.FLUTTER_APPLICATION_PATH=$SRCROOT/../my_flutter_app ENABLE_USER_SCRIPT_SANDBOXING=NO
-
Add Pre-action Run Script to Scheme
Open Product > Scheme > Edit Scheme... > Build (in left side bar) > Pre-action > + > New Run Script Action
Select your project in the Provide build settings from dropdown.
Set the script to the following:
/bin/sh $FLUTTER_SWIFT_PACKAGE_OUTPUT/Scripts/flutter_integration.sh prebuild
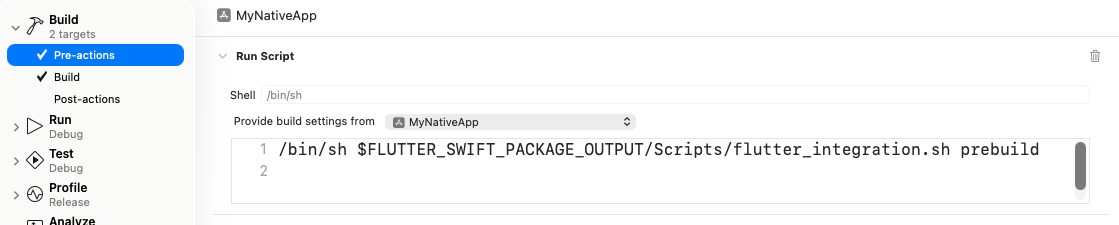
Pre-action Run Script in scheme editor.
-
Add New Run Script Build Phase to Target
Navigate to your target's Build Phases > + > New Run Script Phase
Set the script to the following:
/bin/sh $FLUTTER_SWIFT_PACKAGE_OUTPUT/Scripts/flutter_integration.sh assembleUncheck Based on dependency analysis
Add the following to Input File Lists:
$(FLUTTER_SWIFT_PACKAGE_OUTPUT)/Scripts/FlutterAssembleInputs.xcfilelist
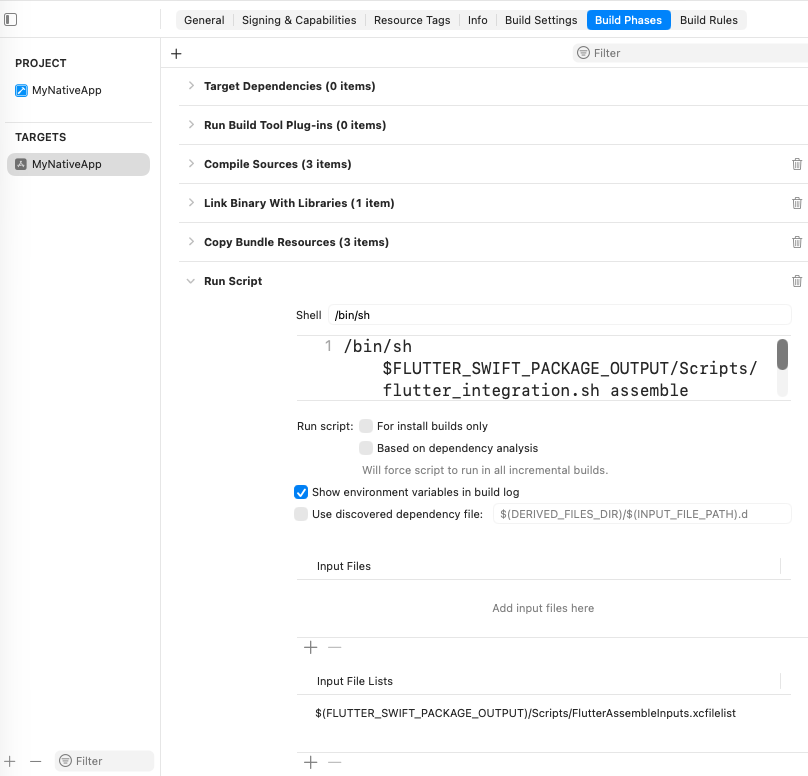
New Run Script Build Phase under Build Phases.
-
(Optional) Set LLDB Init File
Using Flutter's LLDB Init File improves performance when debugging on physical iOS 26+ devices.
Open Product > Scheme > Edit Scheme... > Run (in left side bar).
Set the LLDB Init File to the following path:
$(FLUTTER_SWIFT_PACKAGE_OUTPUT)/Scripts/flutter_lldbinitAlternatively, if your scheme already has an LLDB Init File, you can add Flutter's LLDB file to it. The path to Flutter's LLDB Init File must be relative to the location of your project's LLDB Init File.
command source --relative-to-command-file "../my_flutter_app/build/ios/SwiftPackages/Scripts/flutter_lldbinit"
Set local network privacy permissions
#
On iOS 14 and later, enable the Dart multicast DNS service in the
Debug version of your iOS app.
This adds debugging functionalities such as hot-reload and DevTools
using flutter attach.
To set local network privacy permissions only in the Debug version of your app,
create a separate Info.plist per build configuration.
SwiftUI projects start without an Info.plist file.
If you need to create a property list,
you can do so through Xcode or text editor.
The following instructions assume the default Debug and Release.
Adjust the names as needed depending on your app's build configurations.
-
Create a new property list.
Open your project in Xcode.
In the Project Navigator, click on the project name.
From the Targets list in the Editor pane, click on your app.
Click the Info tab.
Expand Custom iOS Target Properties.
Right-click on the list and select Add Row.
From the dropdown menu, select Bonjour Services. This creates a new property list in the project directory called
Info. This displays asInfo.plistin the Finder.
-
Rename the
Info.plisttoInfo-Debug.plistClick on Info file in the project list at the left.
In the Identity and Type panel at the right, change the Name from
Info.plisttoInfo-Debug.plist.
-
Create a Release property list.
In the Project Navigator, click on
Info-Debug.plist.Select File > Duplicate.... You can also press Cmd + Shift + S.
In the dialog box, set the Save As: field to
Info-Release.plistand click Save.
-
Add the necessary properties to the Debug property list.
In the Project Navigator, click on
Info-Debug.plist.Add the String value
_dartVmService._tcpto the Bonjour Services array.(Optional) To set your desired customized permission dialog text, add the key Privacy - Local Network Usage Description.
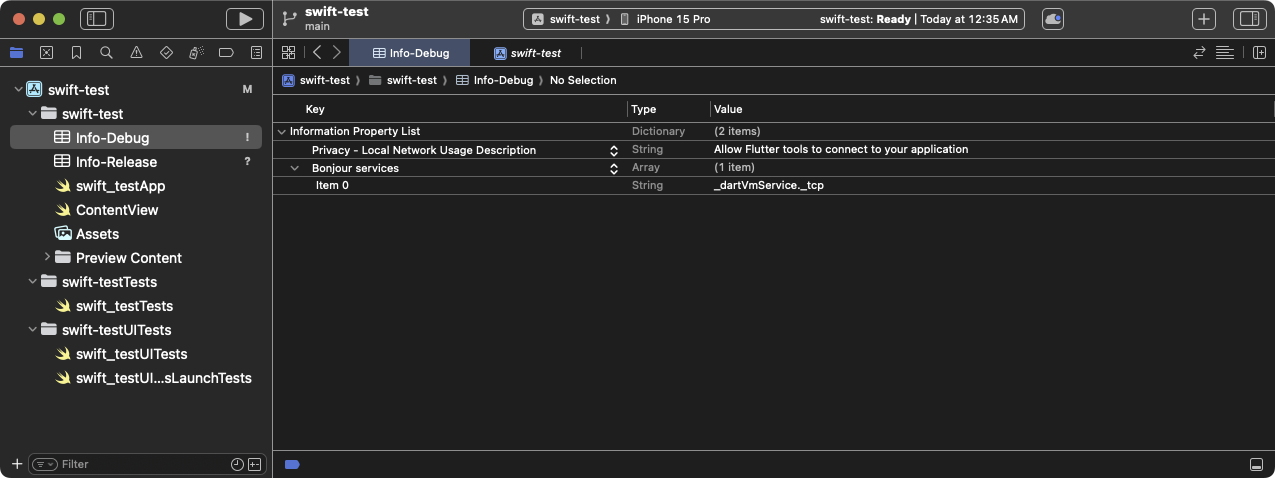
The
Info-Debugproperty list with the Bonjour Services and Privacy - Local Network Usage Description keys added
-
Set the target to use different property lists for different build modes.
In the Project Navigator, click on your project.
Click the Build Settings tab.
Click All and Combined sub-tabs.
In the Search box, type
plist. This limits the settings to those that include property lists.Scroll through the list until you see Packaging.
Click on the Info.plist File setting.
Change the Info.plist File value from
path/to/Info.plisttopath/to/Info-$(CONFIGURATION).plist.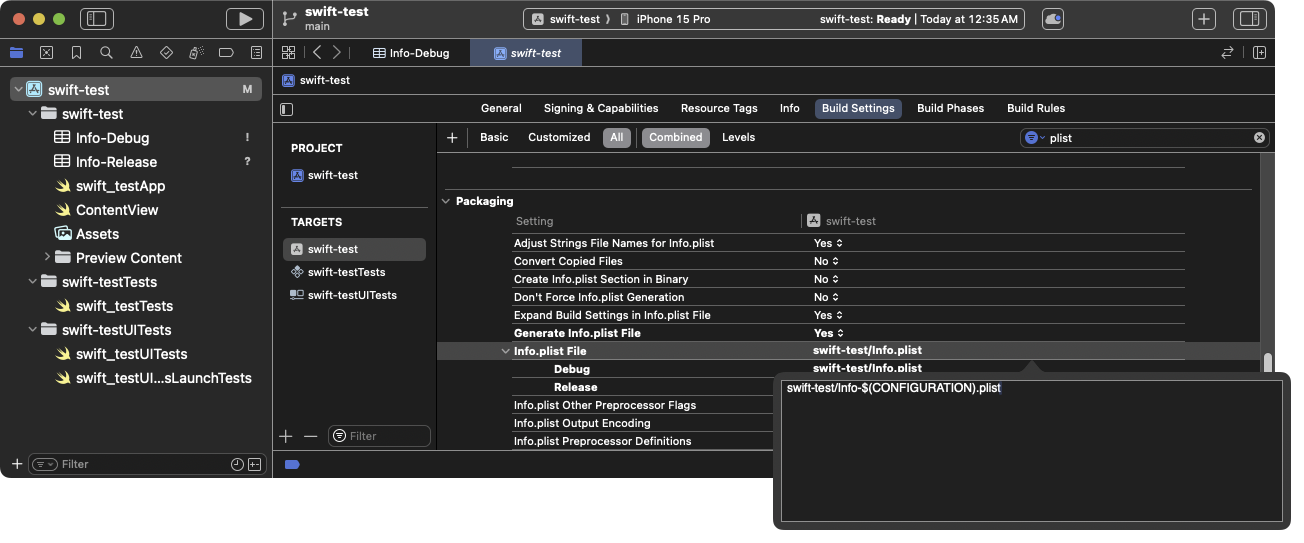
Updating the
Info.plistbuild setting to use build mode-specific property listsThis resolves to the path Info-Debug.plist in Debug and Info-Release.plist in Release.
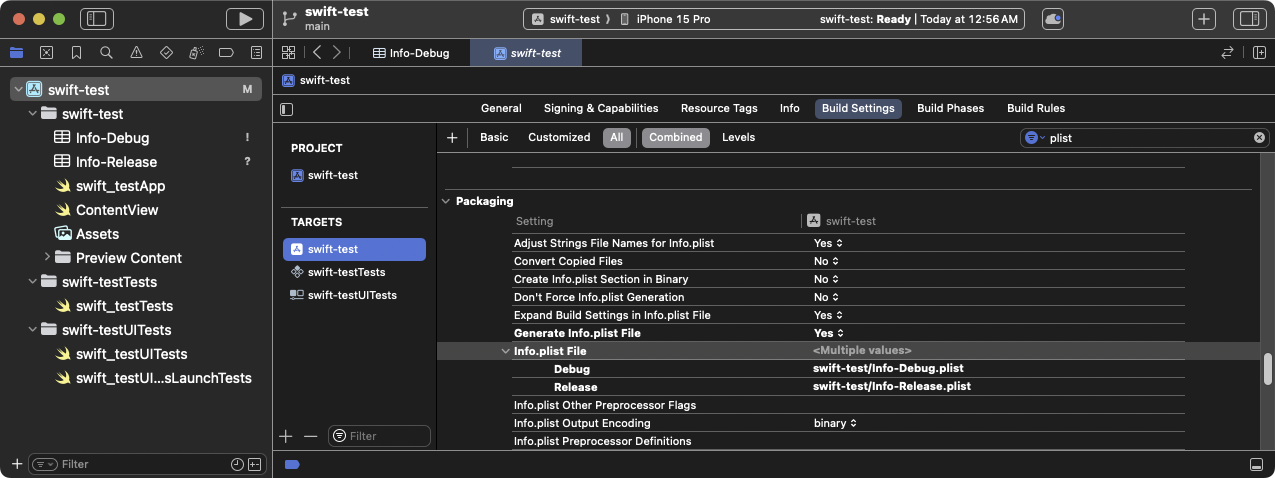
The updated Info.plist File build setting displaying the configuration variations
-
Remove the Release property list from the Build Phases.
In the Project Navigator, click on your project.
Click the Build Phases tab.
Expand Copy Bundle Resources.
If this list includes
Info-Release.plist, click on it and then click the - (minus sign) under it to remove the property list from the resources list.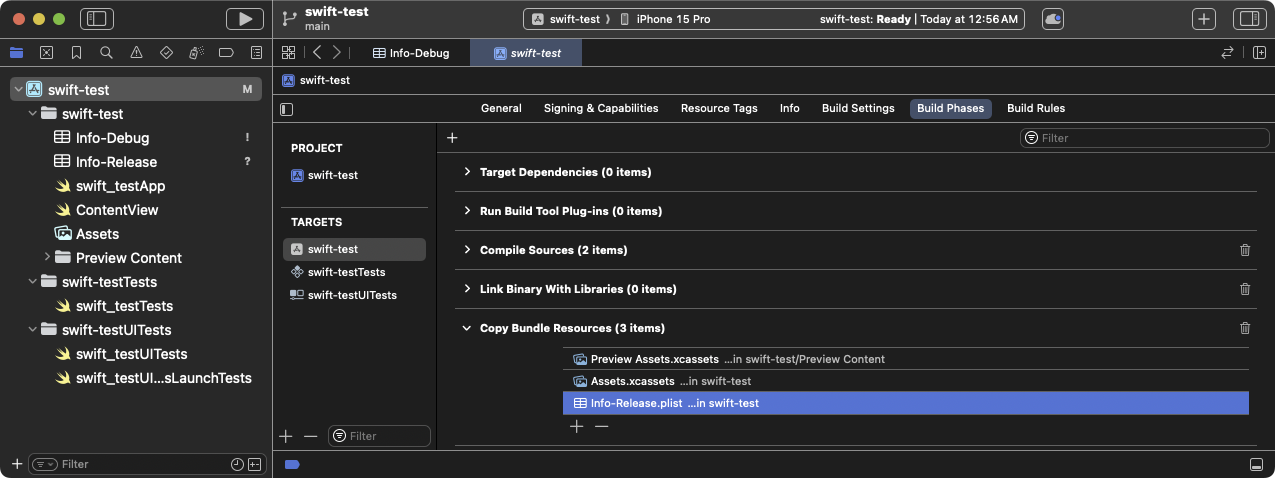
The Copy Bundle build phase displaying the Info-Release.plist setting. Remove this setting.
-
The first Flutter screen your Debug app loads prompts for local network permission.
Click OK.
(Optional) To grant permission before the app loads, enable Settings > Privacy > Local Network > Your App.
Next steps
#You can now add a Flutter screen to your existing iOS app.
Unless stated otherwise, the documentation on this site reflects Flutter 3.44.7. Page last updated on 2026-06-08. View source or report an issue.