# Writing custom platform-specific code
> Learn how to write custom platform-specific code in your app.
This guide describes how to use custom platform-specific
code with Flutter.
## Overview
You can use platform-specific code in your Flutter app.
A few common ways to do this include:
* Use Flutter's platform channel APIs to pass messages
between Flutter and your desired platforms. For more
information, see [Call platform-specific code using platform channels](#example).
* Use the `Pigeon` package to generate type-safe
platform-specific code. For more
information, see [Call platform-specific code using the Pigeon package](#pigeon).
Flutter supports the following platforms and
platform-specific languages:
* **Android**: Kotlin, Java
* **iOS**: Swift, Objective-C
* **Windows**: C++
* **macOS**: Objective-C
* **Linux**: C
:::note
* The information in this page is valid for most platforms,
but platform-specific code for the web generally uses
[JS interoperability][] instead.
* This guide addresses using the platform channel mechanism
if you need to use the platform's APIs in a non-Dart language.
However, you can also write platform-specific Dart code
in your Flutter app by inspecting the
[`defaultTargetPlatform`][] property.
[Platform adaptations][] lists some
platform-specific adaptations that Flutter
automatically performs for you in the framework.
:::
[`defaultTargetPlatform`]: https://api.flutter.dev/flutter/foundation/defaultTargetPlatform.html
## Architectural overview of platform channels {:#architecture}
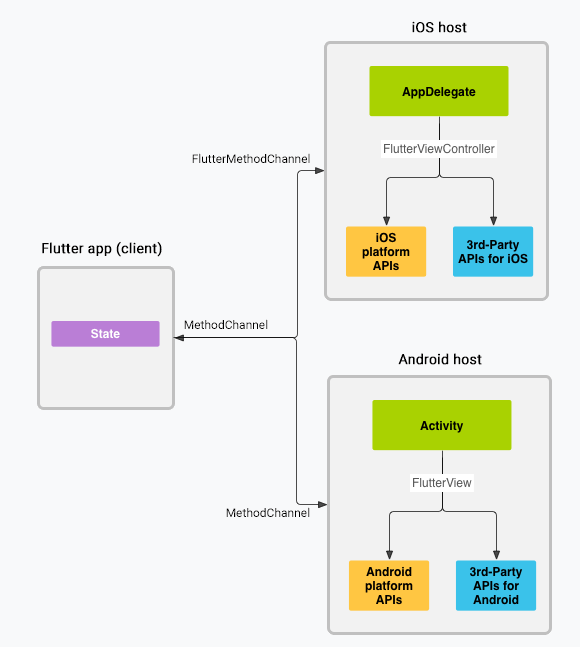
Messages are passed between the client (UI)
and host (platform) using platform
channels as illustrated in this diagram:
{:width="100%"}
In the preceding diagram, messages and responses are passed
asynchronously through channels to ensure the user interface
remains responsive. On the client side,
[`MethodChannel` for Flutter][] enables
sending messages that correspond to method calls. On the
platform side, [`MethodChannel` for Android][] and
[`FlutterMethodChannel` for iOS][] enable receiving method
calls and sending back a result. These classes allow you to
develop a platform plugin with very little _boilerplate_
code.
:::note
* Even though Flutter sends messages to and from Dart asynchronously,
whenever you invoke a channel method, you must invoke that method on the
platform's main thread. See the [section on threading][]
for more information.
* If desired, method calls can also be sent in the reverse direction,
with the platform acting as client to methods implemented in Dart.
For a concrete example, check out the [`quick_actions`][] plugin.
:::
## Data types support {:#codec}
The standard platform channel APIs and the Pigeon package
use a standard message codec called [`StandardMessageCodec`][]
that supports efficient binary serialization of simple
JSON-like values, such as booleans, numbers, Strings,
byte buffers, Lists, and Maps. The serialization and
deserialization of these values to and from messages happens
automatically when you send and receive values.
The following table shows how Dart values are received on the
platform side and vice versa:
| Dart | Kotlin |
| ----------------- | ------------- |
| `null` | `null` |
| `bool` | `Boolean` |
| `int` (<=32 bits) | `Int` |
| `int` (>32 bits) | `Long` |
| `double` | `Double` |
| `String` | `String` |
| `Uint8List` | `ByteArray` |
| `Int32List` | `IntArray` |
| `Int64List` | `LongArray` |
| `Float32List` | `FloatArray` |
| `Float64List` | `DoubleArray` |
| `List` | `List` |
| `Map` | `HashMap` |
{:.table .table-striped}
| Dart | Java |
| ----------------- | --------------------- |
| `null` | `null` |
| `bool` | `java.lang.Boolean` |
| `int` (<=32 bits) | `java.lang.Integer` |
| `int` (>32 bits) | `java.lang.Long` |
| `double` | `java.lang.Double` |
| `String` | `java.lang.String` |
| `Uint8List` | `byte[]` |
| `Int32List` | `int[]` |
| `Int64List` | `long[]` |
| `Float32List` | `float[]` |
| `Float64List` | `double[]` |
| `List` | `java.util.ArrayList` |
| `Map` | `java.util.HashMap` |
{:.table .table-striped}
| Dart | Swift |
| ----------------- | ----------------------------------------- |
| `null` | `nil` (`NSNull` when nested) |
| `bool` | `NSNumber(value: Bool)` |
| `int` (<=32 bits) | `NSNumber(value: Int32)` |
| `int` (>32 bits) | `NSNumber(value: Int)` |
| `double` | `NSNumber(value: Double)` |
| `String` | `String` |
| `Uint8List` | `FlutterStandardTypedData(bytes: Data)` |
| `Int32List` | `FlutterStandardTypedData(int32: Data)` |
| `Int64List` | `FlutterStandardTypedData(int64: Data)` |
| `Float32List` | `FlutterStandardTypedData(float32: Data)` |
| `Float64List` | `FlutterStandardTypedData(float64: Data)` |
| `List` | `Array` |
| `Map` | `Dictionary` |
{:.table .table-striped}
| Dart | Objective-C |
| ----------------- | ------------------------------------------------ |
| `null` | `nil` (`NSNull` when nested) |
| `bool` | `NSNumber numberWithBool:` |
| `int` (<=32 bits) | `NSNumber numberWithInt:` |
| `int` (>32 bits) | `NSNumber numberWithLong:` |
| `double` | `NSNumber numberWithDouble:` |
| `String` | `NSString` |
| `Uint8List` | `FlutterStandardTypedData typedDataWithBytes:` |
| `Int32List` | `FlutterStandardTypedData typedDataWithInt32:` |
| `Int64List` | `FlutterStandardTypedData typedDataWithInt64:` |
| `Float32List` | `FlutterStandardTypedData typedDataWithFloat32:` |
| `Float64List` | `FlutterStandardTypedData typedDataWithFloat64:` |
| `List` | `NSArray` |
| `Map` | `NSDictionary` |
{:.table .table-striped}
| Dart | C++ |
| ------------------ | ---------------------------------------------------------- |
| `null` | `EncodableValue()` |
| `bool` | `EncodableValue(bool)` |
| `int` (<=32 bits) | `EncodableValue(int32_t)` |
| `int` (>32 bits) | `EncodableValue(int64_t)` |
| `double` | `EncodableValue(double)` |
| `String` | `EncodableValue(std::string)` |
| `Uint8List` | `EncodableValue(std::vector)` |
| `Int32List` | `EncodableValue(std::vector)` |
| `Int64List` | `EncodableValue(std::vector)` |
| `Float32List` | `EncodableValue(std::vector)` |
| `Float64List` | `EncodableValue(std::vector)` |
| `List` | `EncodableValue(std::vector)` |
| `Map` | `EncodableValue(std::map)` |
{:.table .table-striped}
| Dart | C (GObject) |
| ------------------ | --------------------------- |
| `null` | `FlValue()` |
| `bool` | `FlValue(bool)` |
| `int` | `FlValue(int64_t)` |
| `double` | `FlValue(double)` |
| `String` | `FlValue(gchar*)` |
| `Uint8List` | `FlValue(uint8_t*)` |
| `Int32List` | `FlValue(int32_t*)` |
| `Int64List` | `FlValue(int64_t*)` |
| `Float32List` | `FlValue(float*)` |
| `Float64List` | `FlValue(double*)` |
| `List` | `FlValue(FlValue)` |
| `Map` | `FlValue(FlValue, FlValue)` |
{:.table .table-striped}
[MessageCodec]: https://api.flutter.dev/flutter/services/MessageCodec-class.html
## Call platform-specific code using platform channels {:#example}
The following code demonstrates how to call
a platform-specific API to retrieve and display
the current battery level. It uses
the Android `BatteryManager` API,
the iOS `device.batteryLevel` API,
the Windows `GetSystemPowerStatus` API,
and the Linux `UPower` API with a single
platform message, `getBatteryLevel()`.
The example adds the platform-specific code inside
the main app itself. If you want to reuse the
platform-specific code for multiple apps,
the project creation step is slightly different
(see [developing packages][plugins]),
but the platform channel code
is still written in the same way.
:::note
The full, runnable source-code for this example is
available in [`/examples/platform_channel/`][]
for Android with Java, iOS with Objective-C,
Windows with C++, and Linux with C.
For iOS with Swift,
see [`/examples/platform_channel_swift/`][].
:::
### Step 1: Create a new app project {:#example-project}
Start by creating a new app:
* In a terminal run: `flutter create batterylevel`
By default, our template supports writing Android code using Kotlin,
or iOS code using Swift. To use Java or Objective-C,
use the `-i` and/or `-a` flags:
* In a terminal run: `flutter create -i objc -a java batterylevel`
### Step 2: Create the Flutter platform client {:#example-client}
The app's `State` class holds the current app state.
Extend that to hold the current battery state.
First, construct the channel. Use a `MethodChannel` with a single
platform method that returns the battery level.
The client and host sides of a channel are connected through
a channel name passed in the channel constructor.
All channel names used in a single app must
be unique; prefix the channel name with a unique 'domain
prefix', for example: `samples.flutter.dev/battery`.
```dart
import 'dart:async';
import 'package:flutter/material.dart';
import 'package:flutter/services.dart';
```
```dart
class _MyHomePageState extends State {
static const platform = MethodChannel('samples.flutter.dev/battery');
// Get battery level.
```
Next, invoke a method on the method channel,
specifying the concrete method to call using
the `String` identifier `getBatteryLevel`.
The call might fail—for example,
if the platform doesn't support the
platform API (such as when running in a simulator),
so wrap the `invokeMethod` call in a try-catch statement.
Use the returned result to update the user interface state in `_batteryLevel`
inside `setState`.
```dart
// Get battery level.
String _batteryLevel = 'Unknown battery level.';
Future _getBatteryLevel() async {
String batteryLevel;
try {
final result = await platform.invokeMethod('getBatteryLevel');
batteryLevel = 'Battery level at $result % .';
} on PlatformException catch (e) {
batteryLevel = "Failed to get battery level: '${e.message}'.";
}
setState(() {
_batteryLevel = batteryLevel;
});
}
```
Finally, replace the `build` method from the template to
contain a small user interface that displays the battery
state in a string, and a button for refreshing the value.
```dart
@override
Widget build(BuildContext context) {
return Material(
child: Center(
child: Column(
mainAxisAlignment: MainAxisAlignment.spaceEvenly,
children: [
ElevatedButton(
onPressed: _getBatteryLevel,
child: const Text('Get Battery Level'),
),
Text(_batteryLevel),
],
),
),
);
}
```
### Step 3: Add an Android platform-specific implementation
Start by opening the Android host portion of your Flutter app
in Android Studio:
1. Start Android Studio
1. Select the menu item **File > Open...**
1. Navigate to the directory holding your Flutter app,
and select the **android** folder inside it. Click **OK**.
1. Open the file `MainActivity.kt` located in the **kotlin** folder in the
Project view.
Inside the `configureFlutterEngine()` method, create a `MethodChannel` and call
`setMethodCallHandler()`. Make sure to use the same channel name as
was used on the Flutter client side.
```kotlin title="MainActivity.kt"
import androidx.annotation.NonNull
import io.flutter.embedding.android.FlutterActivity
import io.flutter.embedding.engine.FlutterEngine
import io.flutter.plugin.common.MethodChannel
class MainActivity: FlutterActivity() {
private val CHANNEL = "samples.flutter.dev/battery"
override fun configureFlutterEngine(@NonNull flutterEngine: FlutterEngine) {
super.configureFlutterEngine(flutterEngine)
MethodChannel(flutterEngine.dartExecutor.binaryMessenger, CHANNEL).setMethodCallHandler {
call, result ->
// This method is invoked on the main thread.
// TODO
}
}
}
```
Add the Android Kotlin code that uses the Android battery APIs to
retrieve the battery level. This code is exactly the same as you
would write in a native Android app.
First, add the needed imports at the top of the file:
```kotlin title="MainActivity.kt"
import android.content.Context
import android.content.ContextWrapper
import android.content.Intent
import android.content.IntentFilter
import android.os.BatteryManager
import android.os.Build.VERSION
import android.os.Build.VERSION_CODES
```
Next, add the following method in the `MainActivity` class,
below the `configureFlutterEngine()` method:
```kotlin title="MainActivity.kt"
private fun getBatteryLevel(): Int {
val batteryLevel: Int
if (VERSION.SDK_INT >= VERSION_CODES.LOLLIPOP) {
val batteryManager = getSystemService(Context.BATTERY_SERVICE) as BatteryManager
batteryLevel = batteryManager.getIntProperty(BatteryManager.BATTERY_PROPERTY_CAPACITY)
} else {
val intent = ContextWrapper(applicationContext).registerReceiver(null, IntentFilter(Intent.ACTION_BATTERY_CHANGED))
batteryLevel = intent!!.getIntExtra(BatteryManager.EXTRA_LEVEL, -1) * 100 / intent.getIntExtra(BatteryManager.EXTRA_SCALE, -1)
}
return batteryLevel
}
```
Finally, complete the `setMethodCallHandler()` method added earlier.
You need to handle a single platform method, `getBatteryLevel()`,
so test for that in the `call` argument.
The implementation of this platform method calls the
Android code written in the previous step, and returns a response for both
the success and error cases using the `result` argument.
If an unknown method is called, report that instead.
Remove the following code:
```kotlin title="MainActivity.kt"
MethodChannel(flutterEngine.dartExecutor.binaryMessenger, CHANNEL).setMethodCallHandler {
call, result ->
// This method is invoked on the main thread.
// TODO
}
```
And replace with the following:
```kotlin title="MainActivity.kt"
MethodChannel(flutterEngine.dartExecutor.binaryMessenger, CHANNEL).setMethodCallHandler {
// This method is invoked on the main thread.
call, result ->
if (call.method == "getBatteryLevel") {
val batteryLevel = getBatteryLevel()
if (batteryLevel != -1) {
result.success(batteryLevel)
} else {
result.error("UNAVAILABLE", "Battery level not available.", null)
}
} else {
result.notImplemented()
}
}
```
Start by opening the Android host portion of your Flutter app
in Android Studio:
1. Start Android Studio
1. Select the menu item **File > Open...**
1. Navigate to the directory holding your Flutter app,
and select the **android** folder inside it. Click **OK**.
1. Open the `MainActivity.java` file located in the **java** folder in the
Project view.
Next, create a `MethodChannel` and set a `MethodCallHandler`
inside the `configureFlutterEngine()` method.
Make sure to use the same channel name as was used on the
Flutter client side.
```java title="MainActivity.java"
import androidx.annotation.NonNull;
import io.flutter.embedding.android.FlutterActivity;
import io.flutter.embedding.engine.FlutterEngine;
import io.flutter.plugin.common.MethodChannel;
public class MainActivity extends FlutterActivity {
private static final String CHANNEL = "samples.flutter.dev/battery";
@Override
public void configureFlutterEngine(@NonNull FlutterEngine flutterEngine) {
super.configureFlutterEngine(flutterEngine);
new MethodChannel(flutterEngine.getDartExecutor().getBinaryMessenger(), CHANNEL)
.setMethodCallHandler(
(call, result) -> {
// This method is invoked on the main thread.
// TODO
}
);
}
}
```
Add the Android Java code that uses the Android battery APIs to
retrieve the battery level. This code is exactly the same as you
would write in a native Android app.
First, add the needed imports at the top of the file:
```java title="MainActivity.java"
import android.content.ContextWrapper;
import android.content.Intent;
import android.content.IntentFilter;
import android.os.BatteryManager;
import android.os.Build.VERSION;
import android.os.Build.VERSION_CODES;
import android.os.Bundle;
```
Then add the following as a new method in the activity class,
below the `configureFlutterEngine()` method:
```java title="MainActivity.java"
private int getBatteryLevel() {
int batteryLevel = -1;
if (VERSION.SDK_INT >= VERSION_CODES.LOLLIPOP) {
BatteryManager batteryManager = (BatteryManager) getSystemService(BATTERY_SERVICE);
batteryLevel = batteryManager.getIntProperty(BatteryManager.BATTERY_PROPERTY_CAPACITY);
} else {
Intent intent = new ContextWrapper(getApplicationContext()).
registerReceiver(null, new IntentFilter(Intent.ACTION_BATTERY_CHANGED));
batteryLevel = (intent.getIntExtra(BatteryManager.EXTRA_LEVEL, -1) * 100) /
intent.getIntExtra(BatteryManager.EXTRA_SCALE, -1);
}
return batteryLevel;
}
```
Finally, complete the `setMethodCallHandler()` method added earlier.
You need to handle a single platform method, `getBatteryLevel()`,
so test for that in the `call` argument. The implementation of
this platform method calls the Android code written
in the previous step, and returns a response for both
the success and error cases using the `result` argument.
If an unknown method is called, report that instead.
Remove the following code:
```java title="MainActivity.java"
new MethodChannel(flutterEngine.getDartExecutor().getBinaryMessenger(), CHANNEL)
.setMethodCallHandler(
(call, result) -> {
// This method is invoked on the main thread.
// TODO
}
);
```
And replace with the following:
```java title="MainActivity.java"
new MethodChannel(flutterEngine.getDartExecutor().getBinaryMessenger(), CHANNEL)
.setMethodCallHandler(
(call, result) -> {
// This method is invoked on the main thread.
if (call.method.equals("getBatteryLevel")) {
int batteryLevel = getBatteryLevel();
if (batteryLevel != -1) {
result.success(batteryLevel);
} else {
result.error("UNAVAILABLE", "Battery level not available.", null);
}
} else {
result.notImplemented();
}
}
);
```
You should now be able to run the app on Android. If using the Android
Emulator, set the battery level in the Extended Controls panel
accessible from the **...** button in the toolbar.
### Step 4: Add an iOS platform-specific implementation
Start by opening the iOS host portion of your Flutter app in Xcode:
1. Start Xcode.
1. Select the menu item **File > Open...**.
1. Navigate to the directory holding your Flutter app, and select the **ios**
folder inside it. Click **OK**.
Add support for Swift in the standard template setup that uses Objective-C:
1. **Expand Runner > Runner** in the Project navigator.
1. Open the file `AppDelegate.swift` located under **Runner > Runner**
in the Project navigator.
Override the `application:didFinishLaunchingWithOptions:` function and create
a `FlutterMethodChannel` tied to the channel name
`samples.flutter.dev/battery`:
:::note
If your app adopts the `UISceneDelegate` lifecycle (default in Flutter 3.41+),
`window` will be `nil` during `application(_:didFinishLaunchingWithOptions:)`.
To avoid a crash, use the `FlutterImplicitEngineDelegate` protocol and
create your `FlutterMethodChannel` in the `didInitializeImplicitFlutterEngine` method.
:::
```swift title="AppDelegate.swift"
@main
@objc class AppDelegate: FlutterAppDelegate, FlutterImplicitEngineDelegate {
func didInitializeImplicitFlutterEngine(_ engineBridge: FlutterImplicitEngineBridge) {
GeneratedPluginRegistrant.register(with: engineBridge.pluginRegistry)
let batteryChannel = FlutterMethodChannel(
name: "samples.flutter.dev/battery",
binaryMessenger: engineBridge.applicationRegistrar.messenger()
)
batteryChannel.setMethodCallHandler({
[weak self] (call: FlutterMethodCall, result: FlutterResult) -> Void in
// This method is invoked on the UI thread.
// Handle battery messages.
})
}
}
```
Next, add the iOS Swift code that uses the iOS battery APIs to retrieve
the battery level. This code is exactly the same as you
would write in a native iOS app.
Add the following as a new method at the bottom of `AppDelegate.swift`:
```swift title="AppDelegate.swift"
private func receiveBatteryLevel(result: FlutterResult) {
let device = UIDevice.current
device.isBatteryMonitoringEnabled = true
if device.batteryState == UIDevice.BatteryState.unknown {
result(FlutterError(code: "UNAVAILABLE",
message: "Battery level not available.",
details: nil))
} else {
result(Int(device.batteryLevel * 100))
}
}
```
Finally, complete the `setMethodCallHandler()` method added earlier.
You need to handle a single platform method, `getBatteryLevel()`,
so test for that in the `call` argument.
The implementation of this platform method calls
the iOS code written in the previous step. If an unknown method
is called, report that instead.
```swift title="AppDelegate.swift"
batteryChannel.setMethodCallHandler({
[weak self] (call: FlutterMethodCall, result: FlutterResult) -> Void in
// This method is invoked on the UI thread.
guard call.method == "getBatteryLevel" else {
result(FlutterMethodNotImplemented)
return
}
self?.receiveBatteryLevel(result: result)
})
```
Start by opening the iOS host portion of the Flutter app in Xcode:
1. Start Xcode.
1. Select the menu item **File > Open...**.
1. Navigate to the directory holding your Flutter app,
and select the **ios** folder inside it. Click **OK**.
1. Make sure the Xcode projects builds without errors.
1. Open the file `AppDelegate.m`, located under **Runner > Runner**
in the Project navigator.
Create a `FlutterMethodChannel` and add a handler inside the `application
didFinishLaunchingWithOptions:` method.
Make sure to use the same channel name
as was used on the Flutter client side.
:::note
If your app adopts the `UISceneDelegate` lifecycle (default in Flutter 3.41+),
`window` will be `nil` during `application:didFinishLaunchingWithOptions:`.
To avoid a crash, use the `FlutterImplicitEngineDelegate` protocol and
create your `FlutterMethodChannel` in the `didInitializeImplicitFlutterEngine` method.
:::
```objc title="AppDelegate.m"
#import
#import "GeneratedPluginRegistrant.h"
@implementation AppDelegate
- (void)didInitializeImplicitFlutterEngine:(NSObject*)engineBridge {
[GeneratedPluginRegistrant registerWithRegistry:engineBridge.pluginRegistry];
FlutterMethodChannel* batteryChannel = [FlutterMethodChannel
methodChannelWithName:@"samples.flutter.dev/battery"
binaryMessenger:engineBridge.applicationRegistrar.messenger];
[batteryChannel setMethodCallHandler:^(FlutterMethodCall* call, FlutterResult result) {
// This method is invoked on the UI thread.
// TODO
}];
}
@end
```
Next, add the iOS ObjectiveC code that uses the iOS battery APIs to
retrieve the battery level. This code is exactly the same as you
would write in a native iOS app.
Add the following method in the `AppDelegate` class, just before `@end`:
```objc title="AppDelegate.m"
- (int)getBatteryLevel {
UIDevice* device = UIDevice.currentDevice;
device.batteryMonitoringEnabled = YES;
if (device.batteryState == UIDeviceBatteryStateUnknown) {
return -1;
} else {
return (int)(device.batteryLevel * 100);
}
}
```
Finally, complete the `setMethodCallHandler()` method added earlier.
You need to handle a single platform method, `getBatteryLevel()`,
so test for that in the `call` argument. The implementation of
this platform method calls the iOS code written in the previous step,
and returns a response for both the success and error cases using
the `result` argument. If an unknown method is called, report that instead.
```objc title="AppDelegate.m"
__weak typeof(self) weakSelf = self;
[batteryChannel setMethodCallHandler:^(FlutterMethodCall* call, FlutterResult result) {
// This method is invoked on the UI thread.
if ([@"getBatteryLevel" isEqualToString:call.method]) {
int batteryLevel = [weakSelf getBatteryLevel];
if (batteryLevel == -1) {
result([FlutterError errorWithCode:@"UNAVAILABLE"
message:@"Battery level not available."
details:nil]);
} else {
result(@(batteryLevel));
}
} else {
result(FlutterMethodNotImplemented);
}
}];
```
You should now be able to run the app on iOS.
If using the iOS Simulator,
note that it doesn't support battery APIs,
and the app displays 'Battery level not available'.
### Step 5: Add a Windows platform-specific implementation
Start by opening the Windows host portion of your Flutter app in Visual Studio:
1. Run `flutter build windows` in your project directory once to generate
the Visual Studio solution file.
1. Start Visual Studio.
1. Select **Open a project or solution**.
1. Navigate to the directory holding your Flutter app, then into the **build**
folder, then the **windows** folder, then select the `batterylevel.sln` file.
Click **Open**.
Add the C++ implementation of the platform channel method:
1. Expand **batterylevel > Source Files** in the Solution Explorer.
1. Open the file `flutter_window.cpp`.
First, add the necessary includes to the top of the file, just
after `#include "flutter_window.h"`:
```cpp title="flutter_window.cpp"
#include
#include
#include
#include
#include
#include
#include
```
Edit the `FlutterWindow::OnCreate` method and create
a `flutter::MethodChannel` tied to the channel name
`samples.flutter.dev/battery`:
```cpp title="flutter_window.cpp"
bool FlutterWindow::OnCreate() {
// ...
RegisterPlugins(flutter_controller_->engine());
flutter::MethodChannel<> channel(
flutter_controller_->engine()->messenger(), "samples.flutter.dev/battery",
&flutter::StandardMethodCodec::GetInstance());
channel.SetMethodCallHandler(
[](const flutter::MethodCall<>& call,
std::unique_ptr> result) {
// TODO
});
SetChildContent(flutter_controller_->view()->GetNativeWindow());
return true;
}
```
Next, add the C++ code that uses the Windows battery APIs to
retrieve the battery level. This code is exactly the same as
you would write in a native Windows application.
Add the following as a new function at the top of
`flutter_window.cpp` just after the `#include` section:
```cpp title="flutter_window.cpp"
static int GetBatteryLevel() {
SYSTEM_POWER_STATUS status;
if (GetSystemPowerStatus(&status) == 0 || status.BatteryLifePercent == 255) {
return -1;
}
return status.BatteryLifePercent;
}
```
Finally, complete the `setMethodCallHandler()` method added earlier.
You need to handle a single platform method, `getBatteryLevel()`,
so test for that in the `call` argument.
The implementation of this platform method calls
the Windows code written in the previous step. If an unknown method
is called, report that instead.
Remove the following code:
```cpp title="flutter_window.cpp"
channel.SetMethodCallHandler(
[](const flutter::MethodCall<>& call,
std::unique_ptr> result) {
// TODO
});
```
And replace with the following:
```cpp title="flutter_window.cpp"
channel.SetMethodCallHandler(
[](const flutter::MethodCall<>& call,
std::unique_ptr> result) {
if (call.method_name() == "getBatteryLevel") {
int battery_level = GetBatteryLevel();
if (battery_level != -1) {
result->Success(battery_level);
} else {
result->Error("UNAVAILABLE", "Battery level not available.");
}
} else {
result->NotImplemented();
}
});
```
You should now be able to run the application on Windows.
If your device doesn't have a battery,
it displays 'Battery level not available'.
### Step 6: Add a macOS platform-specific implementation
Start by opening the macOS host portion of your Flutter app in Xcode:
1. Start Xcode.
1. Select the menu item **File > Open...**.
1. Navigate to the directory holding your Flutter app, and select the **macos**
folder inside it. Click **OK**.
Add the Swift implementation of the platform channel method:
1. **Expand Runner > Runner** in the Project navigator.
1. Open the file `MainFlutterWindow.swift` located under **Runner > Runner**
in the Project navigator.
First, add the necessary import to the top of the file, just after
`import FlutterMacOS`:
```swift title="MainFlutterWindow.swift"
import IOKit.ps
```
Create a `FlutterMethodChannel` tied to the channel name
`samples.flutter.dev/battery` in the `awakeFromNib` method:
```swift title="MainFlutterWindow.swift"
override func awakeFromNib() {
// ...
self.setFrame(windowFrame, display: true)
let batteryChannel = FlutterMethodChannel(
name: "samples.flutter.dev/battery",
binaryMessenger: flutterViewController.engine.binaryMessenger)
batteryChannel.setMethodCallHandler { (call, result) in
// This method is invoked on the UI thread.
// Handle battery messages.
}
RegisterGeneratedPlugins(registry: flutterViewController)
super.awakeFromNib()
}
}
```
Next, add the macOS Swift code that uses the IOKit battery APIs to retrieve
the battery level. This code is exactly the same as you
would write in a native macOS app.
Add the following as a new method at the bottom of `MainFlutterWindow.swift`:
```swift title="MainFlutterWindow.swift"
private func getBatteryLevel() -> Int? {
let info = IOPSCopyPowerSourcesInfo().takeRetainedValue()
let sources: Array = IOPSCopyPowerSourcesList(info).takeRetainedValue() as Array
if let source = sources.first {
let description =
IOPSGetPowerSourceDescription(info, source).takeUnretainedValue() as! [String: AnyObject]
if let level = description[kIOPSCurrentCapacityKey] as? Int {
return level
}
}
return nil
}
```
Finally, complete the `setMethodCallHandler` method added earlier.
You need to handle a single platform method, `getBatteryLevel()`,
so test for that in the `call` argument.
The implementation of this platform method calls
the macOS code written in the previous step. If an unknown method
is called, report that instead.
```swift title="MainFlutterWindow.swift"
batteryChannel.setMethodCallHandler { (call, result) in
switch call.method {
case "getBatteryLevel":
guard let level = getBatteryLevel() else {
result(
FlutterError(
code: "UNAVAILABLE",
message: "Battery level not available",
details: nil))
return
}
result(level)
default:
result(FlutterMethodNotImplemented)
}
}
```
You should now be able to run the application on macOS.
If your device doesn't have a battery,
it displays 'Battery level not available'.
### Step 7: Add a Linux platform-specific implementation
For this example you need to install the `upower` developer headers.
This is likely available from your distribution, for example with:
```console
sudo apt install libupower-glib-dev
```
Start by opening the Linux host portion of your Flutter app in the editor
of your choice. The instructions below are for Visual Studio Code with the
"C/C++" and "CMake" extensions installed, but can be adjusted for other IDEs.
1. Launch Visual Studio Code.
1. Open the **linux** directory inside your project.
1. Choose **Yes** in the prompt asking: `Would you like to configure project "linux"?`.
This enables C++ autocomplete.
1. Open the file `runner/my_application.cc`.
First, add the necessary includes to the top of the file, just
after `#include `:
```c title="runner/my_application.cc"
#include
#include
```
Add an `FlMethodChannel` to the `_MyApplication` struct:
```c title="runnner/my_application.cc"
struct _MyApplication {
GtkApplication parent_instance;
char** dart_entrypoint_arguments;
FlMethodChannel* battery_channel;
};
```
Make sure to clean it up in `my_application_dispose`:
```c title="runner/my_application.cc"
static void my_application_dispose(GObject* object) {
MyApplication* self = MY_APPLICATION(object);
g_clear_pointer(&self->dart_entrypoint_arguments, g_strfreev);
g_clear_object(&self->battery_channel);
G_OBJECT_CLASS(my_application_parent_class)->dispose(object);
}
```
Edit the `my_application_activate` method and initialize
`battery_channel` using the channel name
`samples.flutter.dev/battery`, just after the call to
`fl_register_plugins`:
```c title="runner/my_application.cc"
static void my_application_activate(GApplication* application) {
// ...
fl_register_plugins(FL_PLUGIN_REGISTRY(self->view));
g_autoptr(FlStandardMethodCodec) codec = fl_standard_method_codec_new();
self->battery_channel = fl_method_channel_new(
fl_engine_get_binary_messenger(fl_view_get_engine(view)),
"samples.flutter.dev/battery", FL_METHOD_CODEC(codec));
fl_method_channel_set_method_call_handler(
self->battery_channel, battery_method_call_handler, self, nullptr);
gtk_widget_grab_focus(GTK_WIDGET(self->view));
}
```
Next, add the C code that uses the Linux battery APIs to
retrieve the battery level. This code is exactly the same as
you would write in a native Linux application.
Add the following as a new function at the top of
`my_application.cc` just after the `G_DEFINE_TYPE` line:
```c title="runner/my_application.cc"
static FlMethodResponse* get_battery_level() {
// Find the first available battery and report that.
g_autoptr(UpClient) up_client = up_client_new();
g_autoptr(GPtrArray) devices = up_client_get_devices2(up_client);
if (devices->len == 0) {
return FL_METHOD_RESPONSE(fl_method_error_response_new(
"UNAVAILABLE", "Device does not have a battery.", nullptr));
}
UpDevice* device = UP_DEVICE(g_ptr_array_index(devices, 0));
double percentage = 0;
g_object_get(device, "percentage", &percentage, nullptr);
g_autoptr(FlValue) result =
fl_value_new_int(static_cast(round(percentage)));
return FL_METHOD_RESPONSE(fl_method_success_response_new(result));
}
```
Finally, add the `battery_method_call_handler` function referenced
in the earlier call to `fl_method_channel_set_method_call_handler`.
You need to handle a single platform method, `getBatteryLevel`,
so test for that in the `method_call` argument.
The implementation of this function calls
the Linux code written in the previous step. If an unknown method
is called, report that instead.
Add the following code after the `get_battery_level` function:
```cpp title="runner/my_application.cpp"
static void battery_method_call_handler(FlMethodChannel* channel,
FlMethodCall* method_call,
gpointer user_data) {
g_autoptr(FlMethodResponse) response = nullptr;
if (strcmp(fl_method_call_get_name(method_call), "getBatteryLevel") == 0) {
response = get_battery_level();
} else {
response = FL_METHOD_RESPONSE(fl_method_not_implemented_response_new());
}
g_autoptr(GError) error = nullptr;
if (!fl_method_call_respond(method_call, response, &error)) {
g_warning("Failed to send response: %s", error->message);
}
}
```
You should now be able to run the application on Linux.
If your device doesn't have a battery,
it displays 'Battery level not available'.
## Call platform-specific code using the Pigeon package {:#pigeon}
You can use the [`Pigeon`][] package as
an alternative to Flutter's platform channel APIs
to generate code that sends messages in a
structured, type-safe manner. The workflow for Pigeon
looks like this:
* The Flutter app sends structured
type-safe messages to its _host_, the non-Dart portion
of the app, over a platform channel.
* The _host_ listens on the platform channel, and receives
the message. It then calls into any number of
platform-specific APIs using the native programming
language and sends a response back to the _client_,
the Flutter portion of the app.
Using this package eliminates the need to match
strings between host and client for the names and
data types of messages. It supports nested classes,
grouping messages into APIs, generation of asynchronous
wrapper code, and sending messages in either direction. The
generated code is readable and guarantees there are no
conflicts between multiple clients of different versions.
With Pigeon, the messaging protocol is defined
in a subset of Dart that then generates messaging
code for Android, iOS, macOS, or Windows. For example:
```dart title="pigeon_source.dart"
import 'package:pigeon/pigeon.dart';
class SearchRequest {
final String query;
SearchRequest({required this.query});
}
class SearchReply {
final String result;
SearchReply({required this.result});
}
@HostApi()
abstract class Api {
@async
SearchReply search(SearchRequest request);
}
```
```dart title="use_pigeon.dart"
import 'generated_pigeon.dart';
Future onClick() async {
SearchRequest request = SearchRequest(query: 'test');
Api api = SomeApi();
SearchReply reply = await api.search(request);
print('reply: ${reply.result}');
}
```
You can find a complete example and more information
on the [`pigeon`][] page on pub.dev.
## Channels and platform threading
When invoking channels on the platform side destined for Flutter,
invoke them on the platform's main thread.
When invoking channels in Flutter destined for the platform side,
either invoke them from any `Isolate` that is the root
`Isolate`, _or_ that is registered as a background `Isolate`.
The handlers for the platform side can execute on the platform's main thread
or they can execute on a background thread if using a Task Queue.
You can invoke the platform side handlers asynchronously
and on any thread.
:::note
On Android, the platform's main thread is sometimes
called the "main thread", but it is technically defined
as [the UI thread][]. Annotate methods that need
to be run on the UI thread with `@UiThread`.
On iOS, this thread is officially
referred to as [the main thread][].
:::
### Use plugins and channels from a background isolate {: #using-plugins-and-channels-from-background-isolates }
Plugins and channels can be used by any `Isolate`, but that `Isolate` has to be
a root `Isolate` (the one created by Flutter) or registered as a background
`Isolate` for a root `Isolate`.
The following example shows how to register a background `Isolate` in order to
use a plugin from a background `Isolate`.
```dart
import 'package:flutter/services.dart';
import 'package:shared_preferences/shared_preferences.dart';
void _isolateMain(RootIsolateToken rootIsolateToken) async {
BackgroundIsolateBinaryMessenger.ensureInitialized(rootIsolateToken);
SharedPreferences sharedPreferences = await SharedPreferences.getInstance();
print(sharedPreferences.getBool('isDebug'));
}
void main() {
RootIsolateToken rootIsolateToken = RootIsolateToken.instance!;
Isolate.spawn(_isolateMain, rootIsolateToken);
}
```
### Execute channel handlers on a background thread (Android) {: #executing-channel-handlers-on-background-threads }
In order for a channel's platform side handler to
execute on a background thread on an Android app, you must
use the Task Queue API.
```kotlin
override fun onAttachedToEngine(@NonNull flutterPluginBinding: FlutterPlugin.FlutterPluginBinding) {
val taskQueue =
flutterPluginBinding.binaryMessenger.makeBackgroundTaskQueue()
channel = MethodChannel(flutterPluginBinding.binaryMessenger,
"com.example.foo",
StandardMethodCodec.INSTANCE,
taskQueue)
channel.setMethodCallHandler(this)
}
```
```java
@Override
public void onAttachedToEngine(@NonNull FlutterPluginBinding binding) {
BinaryMessenger messenger = binding.getBinaryMessenger();
BinaryMessenger.TaskQueue taskQueue =
messenger.makeBackgroundTaskQueue();
channel =
new MethodChannel(
messenger,
"com.example.foo",
StandardMethodCodec.INSTANCE,
taskQueue);
channel.setMethodCallHandler(this);
}
```
### Execute channel handlers on a background thread (iOS)
In order for a channel's platform side handler to
execute on a background thread on an iOS app, you must use
the Task Queue API.
```swift
public static func register(with registrar: FlutterPluginRegistrar) {
let taskQueue = registrar.messenger().makeBackgroundTaskQueue?()
let channel = FlutterMethodChannel(name: "com.example.foo",
binaryMessenger: registrar.messenger(),
codec: FlutterStandardMethodCodec.sharedInstance(),
taskQueue: taskQueue)
let instance = MyPlugin()
registrar.addMethodCallDelegate(instance, channel: channel)
}
```
```objc
+ (void)registerWithRegistrar:(NSObject*)registrar {
NSObject* taskQueue =
[[registrar messenger] makeBackgroundTaskQueue];
FlutterMethodChannel* channel =
[FlutterMethodChannel methodChannelWithName:@"com.example.foo"
binaryMessenger:[registrar messenger]
codec:[FlutterStandardMethodCodec sharedInstance]
taskQueue:taskQueue];
MyPlugin* instance = [[MyPlugin alloc] init];
[registrar addMethodCallDelegate:instance channel:channel];
}
```
### Jump to the UI thread (Android) {: #jumping-to-the-ui-thread-in-android }
To comply with channels' UI thread requirement,
you might need to jump from a background thread
to Android's UI thread to execute a channel method.
In Android, you can accomplish this by `post()`ing a
`Runnable` to Android's UI thread `Looper`,
which causes the `Runnable` to execute on the
main thread at the next opportunity.
```kotlin
Handler(Looper.getMainLooper()).post {
// Call the desired channel message here.
}
```
```java
new Handler(Looper.getMainLooper()).post(new Runnable() {
@Override
public void run() {
// Call the desired channel message here.
}
});
```
### Jump to the main thread (iOS) {: #jumping-to-the-main-thread-in-ios }
To comply with channel's main thread requirement,
you might need to jump from a background thread to
iOS's main thread to execute a channel method.
You can accomplish this in iOS by executing a
[block][] on the main [dispatch queue][]:
```objc
dispatch_async(dispatch_get_main_queue(), ^{
// Call the desired channel message here.
});
```
```swift
DispatchQueue.main.async {
// Call the desired channel message here.
}
```
## Supplementals
### Common channels and codecs {:#codec2}
The following is a list of some common platform channel APIs
that you can use to write platform-specific code:
* [`MethodChannel`][] for Flutter: A named channel that you
can use to communicate with platform plugins using
asynchronous method calls. By default this channel uses
the [`StandardMessageCodec`][] codec.
This channel is not type safe, which means calling and
receiving messages depends on the host and client
declaring the same arguments and data types in order for
messages to work.
* [`BasicMessageChannel`][] for Flutter: A named channel
that supports basic, asynchronous message passing, using a
supported message codec. Not type safe.
* [Engine Embedder APIs][] for Platforms: These
platform-specific APIs contain platform-specific
channel APIs.
You can create your own codec or use an existing one. The
following is a list of some existing codecs that you can use
with platform-specific code:
* [`StandardMessageCodec`][]: A commonly used message codec
that encodes and decodes a wide range of data types into
a platform-agnostic binary format for transmission across
platform channels. The serialization and deserialization
of values to and from messages happens automatically when
you send and receive values. For a list of supported
data types, see [Platform channel data types support](#codec).
* [`BinaryCodec`][]: A message codec that passes raw binary
data between the Dart side of your Flutter app and the
native platform side. It does not perform any higher-level
encoding or decoding of data structures.
* [`StringCodec`][]: A message codec that encodes and
decodes strings, using UTF-8 encoding.
* [`JSONMessageCodec`][]: A message codec that encodes and
decodes JSON-formatted data, using UTF-8 encoding.
* [`FirestoreMessageCodec`][]: A message codec that handles
the exchange of messages sent across the platform channel
between your Flutter app and the native
Firebase Firestore SDKs (on Android and iOS).
[MessageCodec]: https://api.flutter.dev/flutter/services/MessageCodec-class.html
### Separate platform-specific code from UI code {:#separate}
If you expect to use your platform-specific code
in multiple Flutter apps, you might consider
separating the code into a platform plugin located
in a directory outside your main application.
See [developing packages][] for details.
### Publish platform-specific code as a package {:#publish}
To share your platform-specific code with other developers
in the Flutter ecosystem, see [publishing packages][].
[`BasicMessageChannel`]: https://api.flutter.dev/flutter/services/BasicMessageChannel-class.html
[`BinaryCodec`]: https://api.flutter.dev/flutter/services/BinaryCodec-class.html
[block]: https://developer.apple.com/library/archive/documentation/Cocoa/Conceptual/ProgrammingWithObjectiveC/WorkingwithBlocks/WorkingwithBlocks.html
[`FirestoreMessageCodec`]: https://github.com/firebase/flutterfire/blob/master/packages/cloud_firestore/cloud_firestore_platform_interface/lib/src/method_channel/utils/firestore_message_codec.dart
[developing packages]: /packages-and-plugins/developing-packages
[Engine Embedder APIs]: https://api.dart.dev/index.html#more-documentation
[`Pigeon`]: https://pub.dev/packages/pigeon
[plugins]: /packages-and-plugins/developing-packages#plugin
[dispatch queue]: https://developer.apple.com/documentation/dispatch/dispatchqueue
[`/examples/platform_channel/`]: https://github.com/flutter/flutter/tree/main/examples/platform_channel
[`/examples/platform_channel_swift/`]: https://github.com/flutter/flutter/tree/main/examples/platform_channel_swift
[JS interoperability]: https://dart.dev/web/js-interop
[`JSONMessageCodec`]: https://api.flutter.dev/flutter/services/JSONMessageCodec-class.html
[`MethodChannel`]: https://api.flutter.dev/flutter/services/MethodChannel-class.html
[`MethodChannel` for Flutter]: https://api.flutter.dev/flutter/services/MethodChannel-class.html
[`MethodChannel` for Android]: https://api.flutter.dev/javadoc/io/flutter/plugin/common/MethodChannel.html
[`FlutterMethodChannel` for iOS]: https://api.flutter.dev/ios-embedder/interface_flutter_method_channel.html
[Platform adaptations]: /platform-integration/platform-adaptations
[publishing packages]: /packages-and-plugins/developing-packages#publish
[`quick_actions`]: https://pub.dev/packages/quick_actions
[section on threading]: #channels-and-platform-threading
[`StandardMessageCodec`]: https://api.flutter.dev/flutter/services/StandardMessageCodec-class.html
[`StringCodec`]: https://api.flutter.dev/flutter/services/StringCodec-class.html
[the main thread]: https://developer.apple.com/documentation/uikit?language=objc
[the UI thread]: https://developer.android.com/guide/components/processes-and-threads#Threads