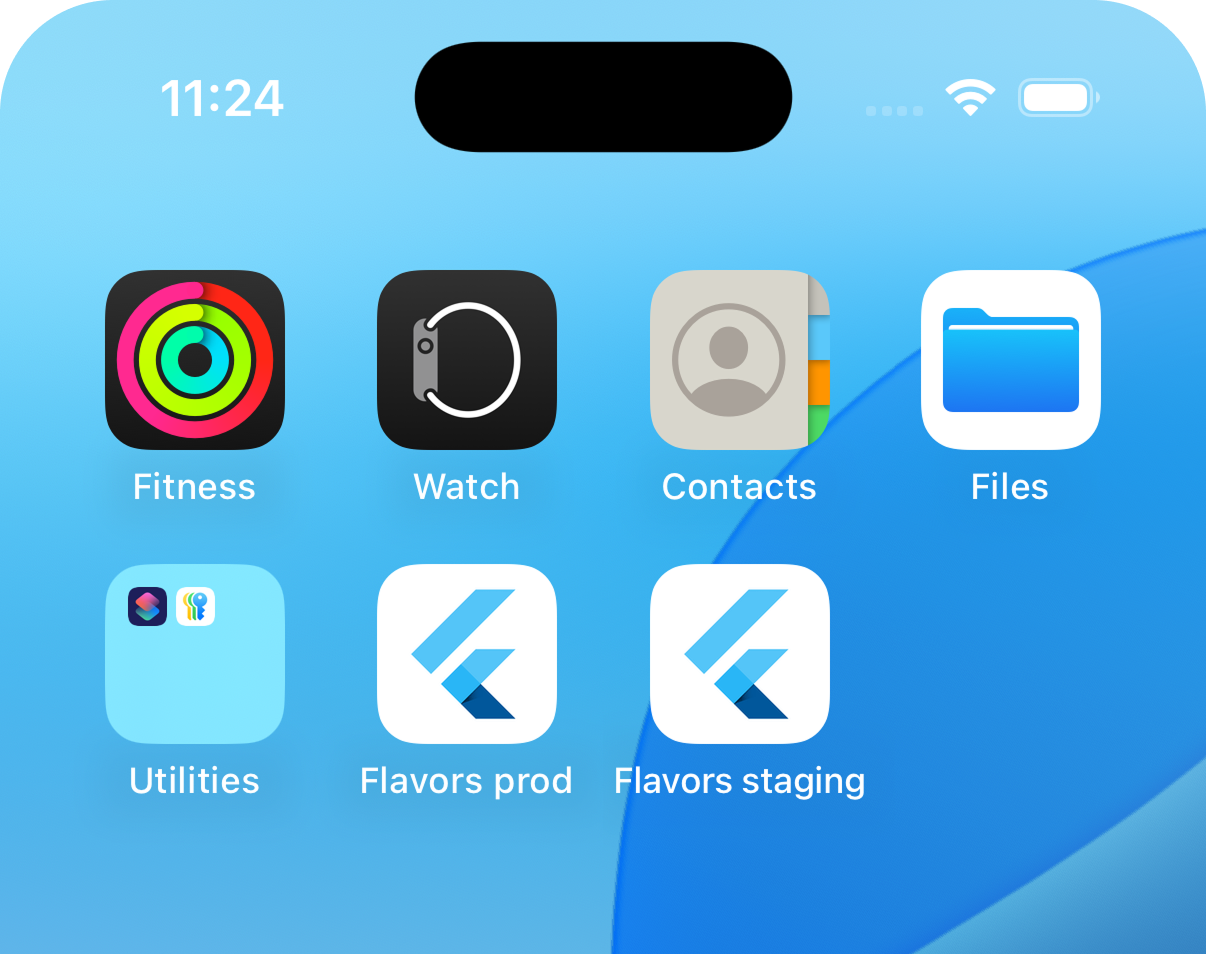
 The following steps show how to add distinct app display
names in Xcode for two schemes called `staging` and
`production` in a project called `flavors_example`.
1. Create user-defined settings in Xcode:
* Open the **project navigator**
(**View > Navigators > Project**).
* In the **project navigator**, at the top, select
**Runner**.
* In the main window under **TARGETS**, select
**Runner**.
* Open the **Build Settings** tab.
* To the left of the Basic tab, click **+** and select
**Add User-Defined Setting**.
* Create a setting named `APP_DISPLAY_NAME`.
* Expand the **APP_DISPLAY_NAME** setting.
* Assign the following values to the following keys:
* **Debug-production**: `Flavors prod`
* **Debug-staging**: `Flavors staging`
* **Profile-production**: `Flavors prod`
* **Profile-staging**: `Flavors staging`
* **Release-production**: `Flavors prod`
* **Release-staging**: `Flavors staging`
1. Update `Info.plist` in Xcode:
* In the project navigator, select
**Runner > Runner > Info** to open
`flavor_test/ios/Runner/Info.plist`.
* Under **Information Property List**, find the
following key and update the value for it:
* **Key**: `CFBundleDisplayName`
* **Value**: `$(APP_DISPLAY_NAME)`
1. Launch the app for each scheme (`staging`, `production`)
and check to make sure that the app display name has
changed for each. To launch a scheme, see the steps in
[Launch an Xcode scheme][].
[Launch an Xcode scheme]: #launch-an-xcode-scheme
### Create distinct icons
If you have multiple schemes, a distinct icon for each
configuration can help you quickly identify which scheme
your deployed app is using.
The following steps show how to add distinct app display
names in Xcode for two schemes called `staging` and
`production` in a project called `flavors_example`.
1. Create user-defined settings in Xcode:
* Open the **project navigator**
(**View > Navigators > Project**).
* In the **project navigator**, at the top, select
**Runner**.
* In the main window under **TARGETS**, select
**Runner**.
* Open the **Build Settings** tab.
* To the left of the Basic tab, click **+** and select
**Add User-Defined Setting**.
* Create a setting named `APP_DISPLAY_NAME`.
* Expand the **APP_DISPLAY_NAME** setting.
* Assign the following values to the following keys:
* **Debug-production**: `Flavors prod`
* **Debug-staging**: `Flavors staging`
* **Profile-production**: `Flavors prod`
* **Profile-staging**: `Flavors staging`
* **Release-production**: `Flavors prod`
* **Release-staging**: `Flavors staging`
1. Update `Info.plist` in Xcode:
* In the project navigator, select
**Runner > Runner > Info** to open
`flavor_test/ios/Runner/Info.plist`.
* Under **Information Property List**, find the
following key and update the value for it:
* **Key**: `CFBundleDisplayName`
* **Value**: `$(APP_DISPLAY_NAME)`
1. Launch the app for each scheme (`staging`, `production`)
and check to make sure that the app display name has
changed for each. To launch a scheme, see the steps in
[Launch an Xcode scheme][].
[Launch an Xcode scheme]: #launch-an-xcode-scheme
### Create distinct icons
If you have multiple schemes, a distinct icon for each
configuration can help you quickly identify which scheme
your deployed app is using.
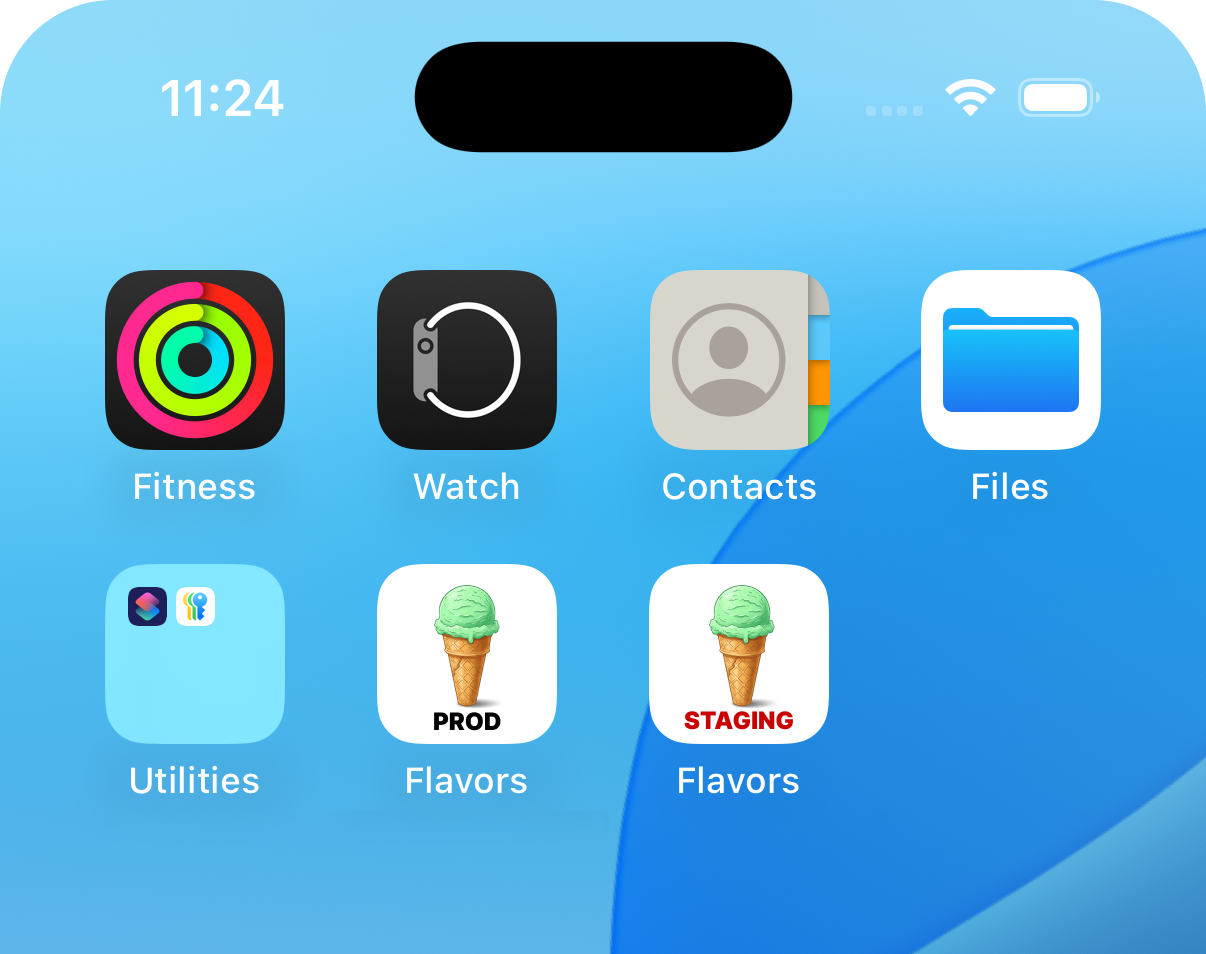 The following steps show how to add a distinct icon in
Xcode for two schemes called `staging` and `production` in
an iOS project called `flavors_example`.
1. Prepare your icons:
* Design your staging icon and production icon in the
design tool of your choice.
* Generate versions of the staging icon and production
icon in the sizes that you need. Save them in
PNG format.
:::note
You can use a tool like [App Icon Generator][]
to generate the versions of your icons.
:::
1. Add the icons to your Xcode project:
* Open the **project navigator**
(**View > Navigators > Project**).
* In the **project navigator**, select
**Runner > Runner > Assets** to open the
**Assets** window.
* Complete the following steps for the staging icon:
* Click **+ > iOS > iOS App icon**.
* Name the icon `AppIcon-staging`.
* Drag your staging icons into the
**AppIcon-staging** window and make sure the icons
are assigned to the correct sizes.
* Repeat the previous step for the production icon.
1. Connect the icons to your schemes:
* Open the **project navigator**.
* In the main window under **TARGETS**, select
**Runner**.
* Open the **General** tab if it's not already open.
* Go to the **Apps Icons and Launch Screen** section and
expand it.
* To the right of the **App icon** field, click
**+** and update the fields as follows:
* **Debug-staging**: `AppIcon-staging`
* **Profile-staging**: `AppIcon-staging`
* **Release-staging**: `AppIcon-staging`
* **Debug-production**: `AppIcon-production`
* **Profile-production**: `AppIcon-production`
* **Release-production**: `AppIcon-production`
1. Launch the app for each scheme (`staging`, `production`)
and check to make sure that the app icon has
changed for each. To launch a scheme, see the steps in
[Launch an Xcode scheme][].
[Launch an Xcode scheme]: #launch-an-xcode-scheme
[App Icon Generator]: https://www.appicon.co/
### Add distinct bundle identifiers
A bundle identifier is a unique identifier for your
application on Apple's platforms. If you are using multiple
Xcode schemes as Flutter flavors, you can have Apple treat
each scheme as a separate application. To do this, you need
to assign a different bundle identifier to each scheme.
This allows you to test new features or bug fixes in one
version of the app (for example `staging`) without affecting
another version of the app (for example, `production`).
The following steps show how to set a unique
bundle identifier for two Xcode schemes called `staging`
and `production` in an iOS project called `flavors_example`.
1. In Xcode, open the **project navigator**
(**View > Navigators > Project**).
1. In the main window under **TARGETS**, select
**Runner**.
1. Open the **Build Settings** tab.
1. Navigate to the **Packaging** section.
1. Expand the **Product Bundle Identifier** setting to
see the different build configurations.
1. For each scheme's build configuration, set the
desired bundle identifier. For example:
* Debug-staging, Profile-staging, Release-staging:
`com.example.flavorsExample.staging`
* Debug, Profile, Release, Debug-production,
Profile-production, Release-production:
`com.example.flavorsExample`
1. Ensure that these bundle identifiers are included in
your App ID and your App ID is [registered in your Apple Developer account][].
[registered in your Apple Developer account]: https://developer.apple.com/help/account/identifiers/register-an-app-id/
### Bundle assets
If you have assets that are only used in a specific flavor
in your app, you can configure them to only be bundled into
your app when launching that flavor. This prevents your
app bundle size from being bloated by unused assets. To
bundle assets for each flavor, add the `flavors` subfield
to the `assets` field in your project's pubspec. To learn
more, see the [`assets` field][] in
[Flutter pubspec options][].
[`assets` field]: /tools/pubspec#assets
[Flutter pubspec options]: /tools/pubspec
### Update Podfiles
If you are creating new Xcode schemes for a Flutter iOS
project and you have an iOS Podfile in an existing
Flutter project, you must update the Flutter iOS Podfile to
match the changes you made in Xcode.
The following steps show how to update your iOS Podfile to
include two new Xcode schemes called `staging` and
`production` in a Flutter project called `flavors_example`.
You can also use these steps to update a macOS
project by replacing any reference to `iOS` with `macOS`.
1. In your IDE, open the `ios/Podfile` file.
1. Make the following updates and save your changes.
```ruby title="flavors_example/ios/Podfile"
project 'Runner', {
...
'Debug' => :debug,
'Debug-staging' => :debug,
'Debug-production' => :debug,
'Profile' => :release,
'Profile-staging' => :release,
'Profile-production' => :release,
'Release' => :release,
'Release-staging' => :release,
'Release-production' => :release,
...
```
### Add unique build settings
You can use [build settings][] to govern your iOS build
process from compilation and linking to debugging and
distribution. One way that you can use build settings
with Flutter flavors is to assign those build settings
to Xcode build configurations. For example, you might want
to assign different API URLs to `Debug-staging` and
`Debug-production`. For example:
```plaintext title="debug-staging-settings.xcconfig"
# Debug-staging build settings
API_BASE_URL = staging.flavors.com/api
```
```plaintext title="debug-production-settings.xcconfig"
# Debug-production build settings
API_BASE_URL = flavors.com/api
```
If you would like to add additional build settings for
a specific build configuration, see Apple's
[Adding a build configuration file to your project][].
[build settings]: https://developer.apple.com/documentation/xcode/build-settings-reference/
[Adding a build configuration file to your project]: https://developer.apple.com/documentation/xcode/adding-a-build-configuration-file-to-your-project
### Add additional customizations
This document contains a few common Xcode scheme
configurations, but there are many more that you can apply.
To learn about them, see
[Customizing the build schemes for a project][].
[Customizing the build schemes for a project]: https://developer.apple.com/documentation/xcode/customizing-the-build-schemes-for-a-project
## More information
For more information on creating and using flavors, check
out the following resources:
* [How to set up Flutter & Firebase with Multiple Flavors
using the FlutterFire CLI][flutterfire-cli]
* [Build flavors in Flutter (Android and iOS) with different
Firebase projects per flavor Flutter Ready to Go][flavors-firebase]
[flutterfire-cli]: https://codewithandrea.com/articles/flutter-firebase-multiple-flavors-flutterfire-cli/
[flavors-firebase]: https://medium.com/@animeshjain/build-flavors-in-flutter-android-and-ios-with-different-firebase-projects-per-flavor-27c5c5dac10b
The following steps show how to add a distinct icon in
Xcode for two schemes called `staging` and `production` in
an iOS project called `flavors_example`.
1. Prepare your icons:
* Design your staging icon and production icon in the
design tool of your choice.
* Generate versions of the staging icon and production
icon in the sizes that you need. Save them in
PNG format.
:::note
You can use a tool like [App Icon Generator][]
to generate the versions of your icons.
:::
1. Add the icons to your Xcode project:
* Open the **project navigator**
(**View > Navigators > Project**).
* In the **project navigator**, select
**Runner > Runner > Assets** to open the
**Assets** window.
* Complete the following steps for the staging icon:
* Click **+ > iOS > iOS App icon**.
* Name the icon `AppIcon-staging`.
* Drag your staging icons into the
**AppIcon-staging** window and make sure the icons
are assigned to the correct sizes.
* Repeat the previous step for the production icon.
1. Connect the icons to your schemes:
* Open the **project navigator**.
* In the main window under **TARGETS**, select
**Runner**.
* Open the **General** tab if it's not already open.
* Go to the **Apps Icons and Launch Screen** section and
expand it.
* To the right of the **App icon** field, click
**+** and update the fields as follows:
* **Debug-staging**: `AppIcon-staging`
* **Profile-staging**: `AppIcon-staging`
* **Release-staging**: `AppIcon-staging`
* **Debug-production**: `AppIcon-production`
* **Profile-production**: `AppIcon-production`
* **Release-production**: `AppIcon-production`
1. Launch the app for each scheme (`staging`, `production`)
and check to make sure that the app icon has
changed for each. To launch a scheme, see the steps in
[Launch an Xcode scheme][].
[Launch an Xcode scheme]: #launch-an-xcode-scheme
[App Icon Generator]: https://www.appicon.co/
### Add distinct bundle identifiers
A bundle identifier is a unique identifier for your
application on Apple's platforms. If you are using multiple
Xcode schemes as Flutter flavors, you can have Apple treat
each scheme as a separate application. To do this, you need
to assign a different bundle identifier to each scheme.
This allows you to test new features or bug fixes in one
version of the app (for example `staging`) without affecting
another version of the app (for example, `production`).
The following steps show how to set a unique
bundle identifier for two Xcode schemes called `staging`
and `production` in an iOS project called `flavors_example`.
1. In Xcode, open the **project navigator**
(**View > Navigators > Project**).
1. In the main window under **TARGETS**, select
**Runner**.
1. Open the **Build Settings** tab.
1. Navigate to the **Packaging** section.
1. Expand the **Product Bundle Identifier** setting to
see the different build configurations.
1. For each scheme's build configuration, set the
desired bundle identifier. For example:
* Debug-staging, Profile-staging, Release-staging:
`com.example.flavorsExample.staging`
* Debug, Profile, Release, Debug-production,
Profile-production, Release-production:
`com.example.flavorsExample`
1. Ensure that these bundle identifiers are included in
your App ID and your App ID is [registered in your Apple Developer account][].
[registered in your Apple Developer account]: https://developer.apple.com/help/account/identifiers/register-an-app-id/
### Bundle assets
If you have assets that are only used in a specific flavor
in your app, you can configure them to only be bundled into
your app when launching that flavor. This prevents your
app bundle size from being bloated by unused assets. To
bundle assets for each flavor, add the `flavors` subfield
to the `assets` field in your project's pubspec. To learn
more, see the [`assets` field][] in
[Flutter pubspec options][].
[`assets` field]: /tools/pubspec#assets
[Flutter pubspec options]: /tools/pubspec
### Update Podfiles
If you are creating new Xcode schemes for a Flutter iOS
project and you have an iOS Podfile in an existing
Flutter project, you must update the Flutter iOS Podfile to
match the changes you made in Xcode.
The following steps show how to update your iOS Podfile to
include two new Xcode schemes called `staging` and
`production` in a Flutter project called `flavors_example`.
You can also use these steps to update a macOS
project by replacing any reference to `iOS` with `macOS`.
1. In your IDE, open the `ios/Podfile` file.
1. Make the following updates and save your changes.
```ruby title="flavors_example/ios/Podfile"
project 'Runner', {
...
'Debug' => :debug,
'Debug-staging' => :debug,
'Debug-production' => :debug,
'Profile' => :release,
'Profile-staging' => :release,
'Profile-production' => :release,
'Release' => :release,
'Release-staging' => :release,
'Release-production' => :release,
...
```
### Add unique build settings
You can use [build settings][] to govern your iOS build
process from compilation and linking to debugging and
distribution. One way that you can use build settings
with Flutter flavors is to assign those build settings
to Xcode build configurations. For example, you might want
to assign different API URLs to `Debug-staging` and
`Debug-production`. For example:
```plaintext title="debug-staging-settings.xcconfig"
# Debug-staging build settings
API_BASE_URL = staging.flavors.com/api
```
```plaintext title="debug-production-settings.xcconfig"
# Debug-production build settings
API_BASE_URL = flavors.com/api
```
If you would like to add additional build settings for
a specific build configuration, see Apple's
[Adding a build configuration file to your project][].
[build settings]: https://developer.apple.com/documentation/xcode/build-settings-reference/
[Adding a build configuration file to your project]: https://developer.apple.com/documentation/xcode/adding-a-build-configuration-file-to-your-project
### Add additional customizations
This document contains a few common Xcode scheme
configurations, but there are many more that you can apply.
To learn about them, see
[Customizing the build schemes for a project][].
[Customizing the build schemes for a project]: https://developer.apple.com/documentation/xcode/customizing-the-build-schemes-for-a-project
## More information
For more information on creating and using flavors, check
out the following resources:
* [How to set up Flutter & Firebase with Multiple Flavors
using the FlutterFire CLI][flutterfire-cli]
* [Build flavors in Flutter (Android and iOS) with different
Firebase projects per flavor Flutter Ready to Go][flavors-firebase]
[flutterfire-cli]: https://codewithandrea.com/articles/flutter-firebase-multiple-flavors-flutterfire-cli/
[flavors-firebase]: https://medium.com/@animeshjain/build-flavors-in-flutter-android-and-ios-with-different-firebase-projects-per-flavor-27c5c5dac10b